Reclaimed Wood DIY Studio Desk
When you DIY, it can be a rewarding experience in which you learn a ton and create something truly unique. You're able to build exactly what you're looking for and feel accomplished for doing so. That's why when it came time for a new desk in my home studio/office, I decided to create my own. The featured desk shown here is the result of 40 plus hours of work and a lot of thought and research along the way. This post will walk you through everything that lead to my final creation. From the reasoning for building the desk, finding materials, constructing the table top, assembling the frame, and everything else in between:
So first, a little background on myself and how the idea for the new desk came about. I work from home, which means I spend a lot of time in my home office, as well as other parts of my house working. Before building this desk, all that time was spent sitting. On top of that, even the time not spent working was spent sitting: working on music at my desk, lounging around, sitting down on the couch using my laptop, watching a movie or TV with my girlfriend. The majority of my day was spent sitting with the exception of exercising a few times a week. And it was starting to catch up with me. I'm only 25 years old (at the time of writing this). I did not want to form a bad habit nor start my career off with a long life of sitting all the time.

Simple Table™ Kits
- Modern, minimalistic look
- Easy to assemble
- Customize the height and width
- Heavy-duty construction
On days where I spent a lot of time sitting, I could really feel it. In my hips was the worst. They would get really tight and bother me. I tried stretching, which helped to some degree, but there was still a problem. So I decided to build a standing desk. This would allow me to stretch my legs and hips throughout the day and hopefully help alleviate the problem. Even just a few minutes standing each hour would help.
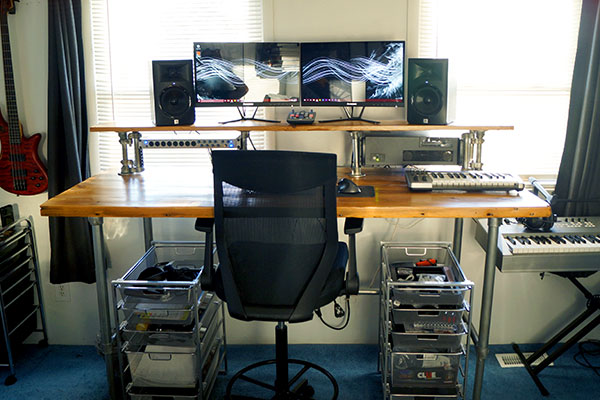
I wanted the desk to have few unique features: First, it needed to have the ability to be positioned at standing height (which was quite the tall task considering I'm 6'5"). However, I also wanted the desk to have the ability to be positioned at sitting height. This would be my first standing desk, so I wanted a fall back, in case I didn't like it. Second, I wanted the desk to use reclaimed wood for the table top. I had done a lot of internet searching on Google and Pinterest and really liked the look that reclaimed wood can give. Third, I wanted there to be an additional shelf that would rest along the table top. My old desk had a platform placed on top but in my new desk, I wanted this shelf to be integrated into the design. It would support my two computer monitors on top but also hold my recording interface and rackmount computer. And fourth, I wanted the ability to easily move the desk and have access to the back of the rack equipment if necessary. My old desk was extremely heavy and hard to move. It was hard to access the back of my computer and audio interface if needed.
Below, is a picture of my old desk. You can see how there is a platform placed across to support my monitors and my audio interface and computer sat below that. This desk was made entirely from Cherry wood, which made it extremely heavy and hard to move.

So with those goals in mind and a lot of time spent browsing the internet, I came up with a design. Since I write for this blog often and have worked with Kee Klamp fittings before, I knew that I wanted to use Kee Klamp fittings and pipe for the desk frame.
I reached out to Josh at Simplified Building to help create a Sketch up drawing for what I was envisioning. With the help of Josh, we came up with the following design:
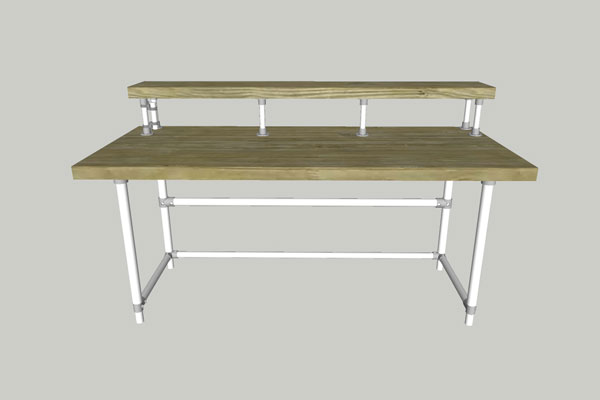
The frame is built entirely using Kee Klamp fittings and pipe. The frame uses different size fittings and pipe to allow the frame to be adjustable in height. This would allow me to position the desk at standing or sitting height. Another unique feature about the desk was the shelf. It would use Pin and Eye fittings to allow the rack gear to rotate out in order to access the back. One final thing, not pictured in the drawing, were the casters that would be attached to the frame, allowing the desk to move around if need be.
Below, is a closer look at how the desk comes together and what fittings are used:
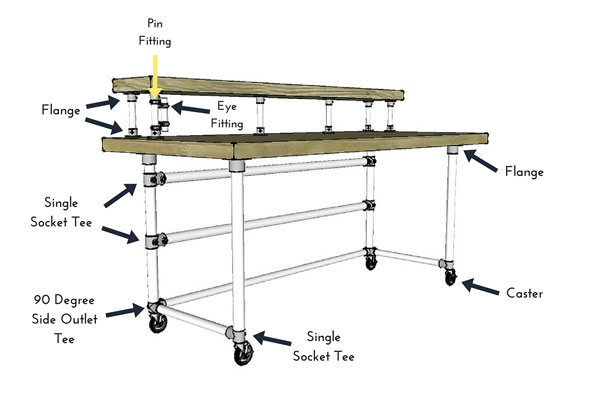
Desk:
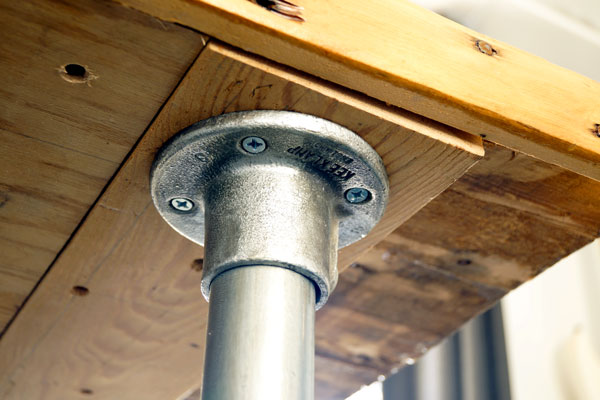
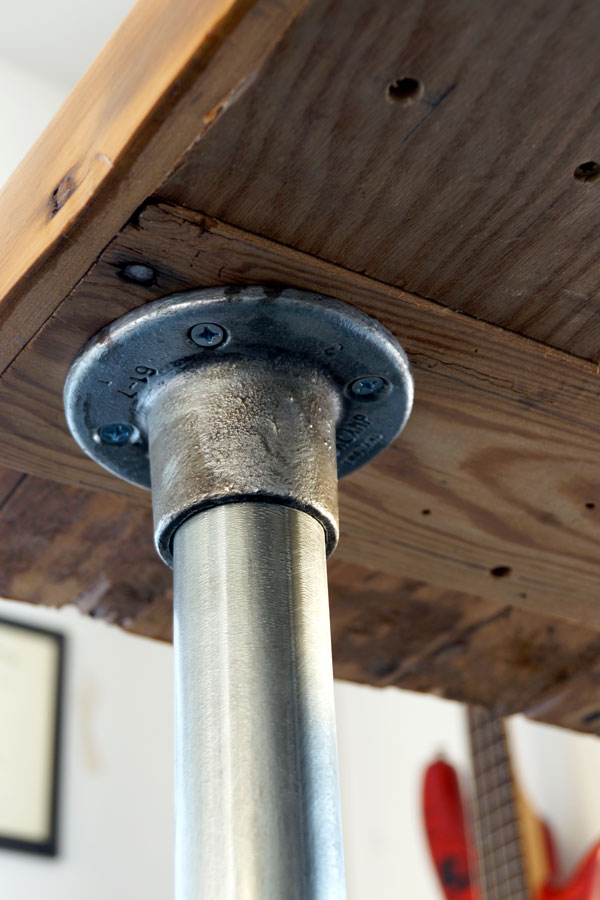
- 4x 61-7 Flange fittings
- 4x 10⁻⁷ Single Socket Tee fittings
- 2x 10⁻⁶ Single Socket Tee fittings
- 2x 21-6 90 Degree Side Outlet Tee fittings
- 4x 4" Size 6 Casters
- 4x 22" Size 7 Gator Tubing (Outside Legs)
- 4x 22" Size 6 Gator Tubing (Inside Legs)
- 2x 60" Size 7 Gator Tubing
- 1x 60" Size 6 Gator Tubing
- 2x 22" Size 6 Gator Tubing
Shelf:
- 12x 61-5 Flange fittings
- 4x 78-5 Eye fittings
- 4x 83-5 Pin fittings
- 8x 7" Size 5 Gator Tubing
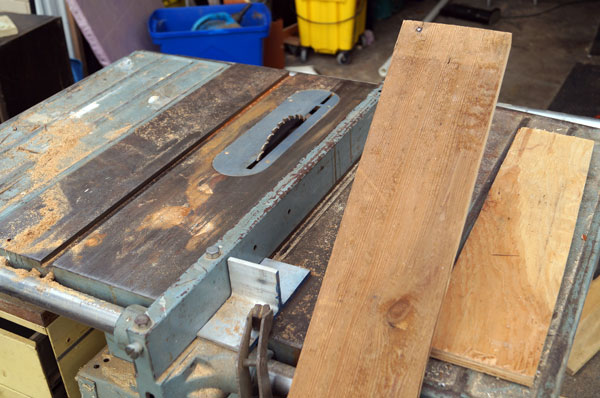
With the design settled, now I just needed to find the wood to create the desk table top. I took to Craigslist to try to find something I could use. After a few weeks of searching, I stumbled across something that might work: a weathered barn door. I decided to go with it and the project was in full motion.
Below, is the barn door I bought to be used to create the desk table top. I paid $100 for the door. Which seemed like a bit much at the time but since then I've seen many similar barn doors on Craigslist go for that price and up to even $250. So I guess it wasn't too bad even for a softwood.
I'm not great at identifying different types of wood. But, through the help of some more experienced people, we figured it was Western Cedar.
At this point, I was a bit concerned how the wood would fare as a table top. Since Cedar is a softwood, it is prone to chipping and denting easily. However, I decided to proceed because I liked the look and thought it would be a unique piece when finished.
With the wood picked out and the design decided upon, it was time to get to work.
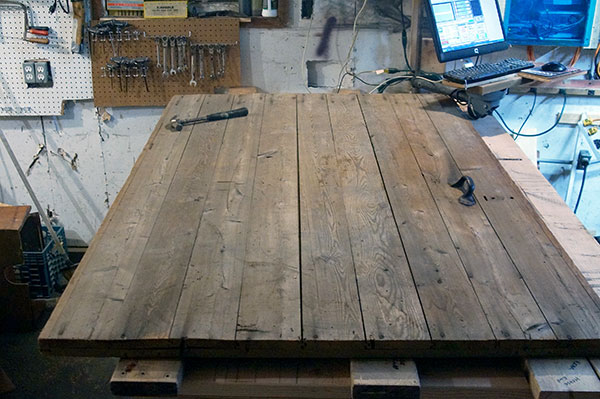
First things first, I began to sand what would be the top of the desk table top. The barn door was weathered a mute grayish color from many years of outdoor abuse (I'm not exactly sure how old it was but it did have handmade nails in it, if that says anything about its age). However, I wanted the table top to have more of a tan color. The other side wasn't weathered as much and I could tell once sanded, it would achieve this look.
I started sanding using a belt sander as well as an orbital sander. Using a low grit, I sanded away the grayish color until the true color was revealed. The goal here was do some rough sanding to reveal the true color and confirm that this was something that I would want to use for the desk table top.
Below, you can see the comparison of how the the barn door looked when I first got it and after some time sanding.
After sanding it down, I was able to get a better idea of how the table top would turn out and decided to keep going with the idea.
However, the barn door had spaces in between each of the planks of wood. This due to the fact that the wood was not glued together and years of separating and warping. I wanted the table top to be a solid unit without any visible gaps. So I decided to take the barn door apart and join the boards together. It took quite some time but finally I got all the boards apart.
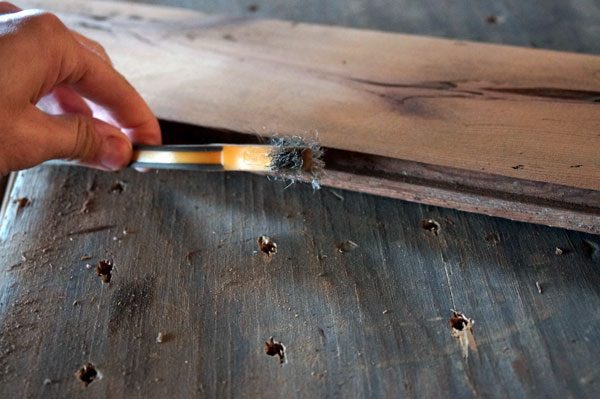
With the boards apart, I then moved on to cleaning the tongue and grooves of each boards to free any dirt, gravel, or other built up. Yet, even after cleaning out the grooves thoroughly, the boards still didn't line up perfectly. There were still some large gaps when placed into one another. The boards were too warped to join this way.
So I scraped that idea and decided to rip the tongue and grooves off the boards completely. This would give a straight edge on each side to then glue the boards together.
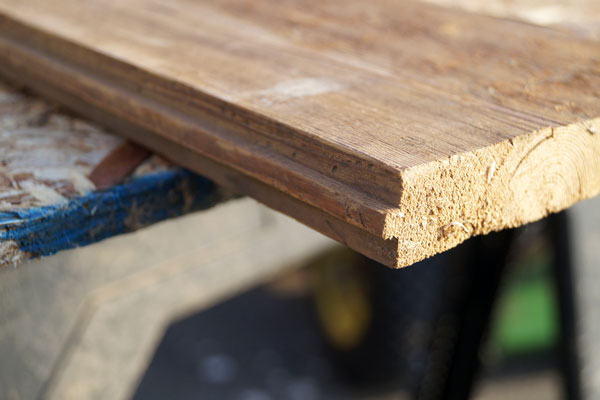
I ripped just enough off each board to take the tongue and grooves off giving each board a straight edge.
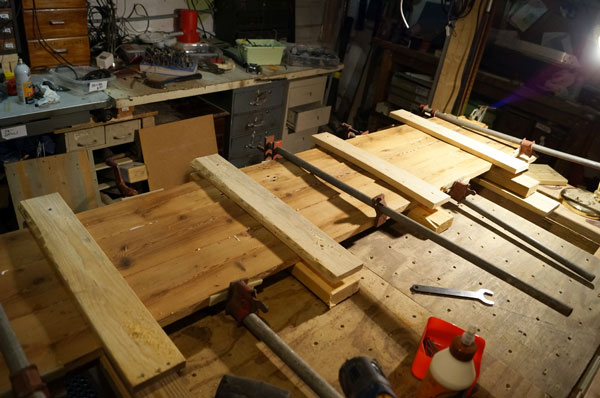
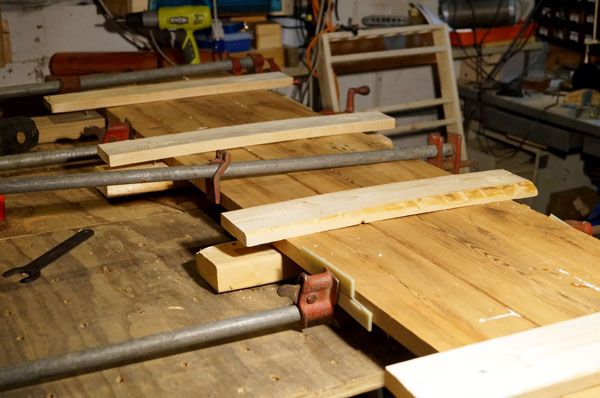
From there, I was able to join the boards together. To join the boards and start to create the table top, I glued the boards together in sections. There were nine boards total taken from the barn door. The table top would end up utilizing six boards as well as the edging. The shelf would utilize two of the boards.
First, I glued three of the boards together at one time. Then, another three boards together. From there, I was able to join these two sections.
When gluing the sections, I used five bar clamps to pull the boards together. I also used a few pieces of 2x4s to clamp the boards down in order to straighten the sections out and keep it as level as possible.
This process took about three to four days to complete. This allowed the glue to dry completely for 24 hours.
However, even with joining the boards in this way, the surface was still a bit uneven and needed to be planed down. We do not have a planer but we did have some hand planes. Using a hand plane, I planed the gaps and unevenness down that was created by joining the boards together.
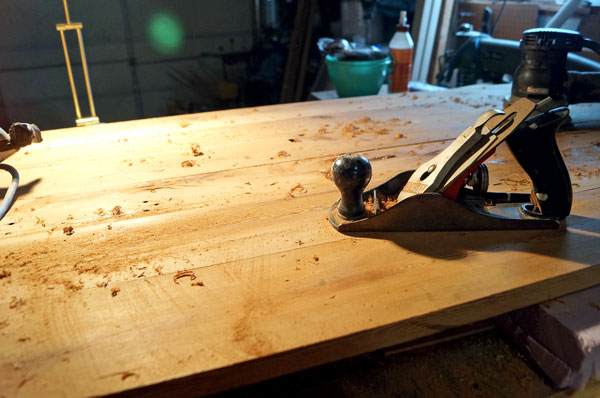
After doing all this, I noticed the entire table top had some warp to it. While, I could have just compensated for this by adjusting the legs of the desk frame, with the help of my father we came up with a better idea.
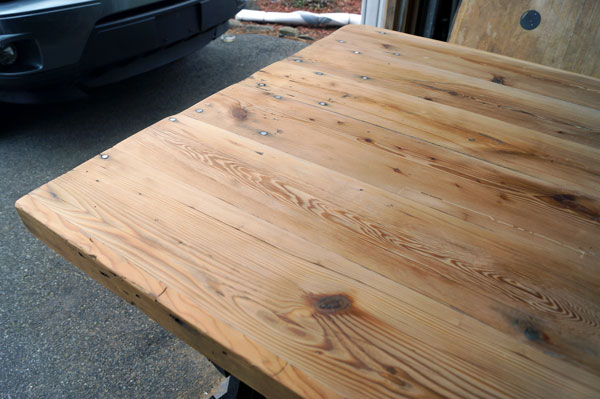
We had some hard plywood, I believe oak, laying around that we could use to help straighten the table top out. I cut the plywood down to size, and placed it across the bottom of the table top. Then using torque screws, I drilled through the plywood into the table top made from the barn door boards. Starting from the center of the plywood, working my way out every six inches both horizontally and vertically, I screwed into the the table top. This helped to straighten out the table top and got rid of the slight warp. It also helped to create a more solid unit and hopefully prevent the boards from warping in the future or the desk pulling apart.
At this point, I also used one of the leftover boards and cut two pieces from it that were the exact width of the desk. I placed these boards along the bottom of the table top and attached them using the same method I used to attach the piece of plywood. Again, this was to help solidify the table but it would also add to the look. The flange fittings used in the desk frame would eventually be mounted to the two boards.
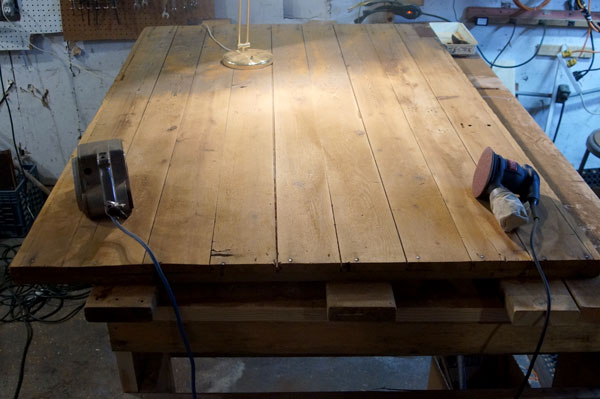
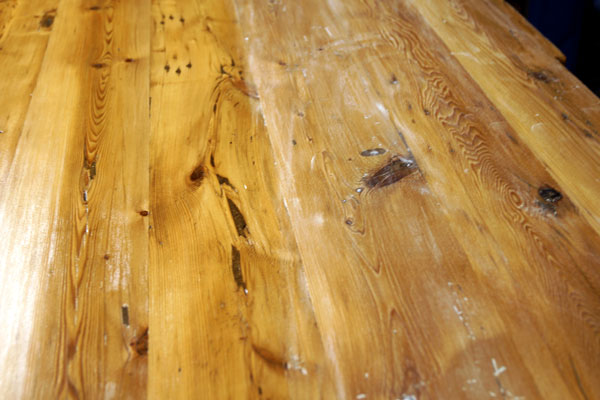
With the boards all joined together and planed down to create the table top, now it was time for the final sanding before applying a finish. Using the orbital sander, I sanded the table top until completely smooth starting with 80 grit sandpaper, then 120 grit, and then 180 grit. I then used 220 grit to hand sand the surface.
Once the table top was sanded completely, I moved on to the final finish.
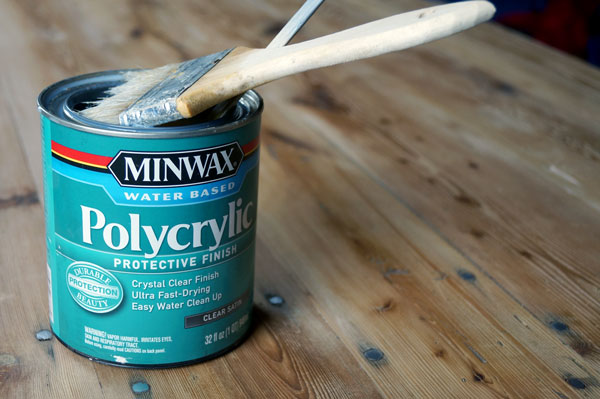
I tried a few different finishes on a scrap piece of wood from the barn door before deciding on the final finish. I tried pure Tung Oil, Natural Stain, and a few different Polyurethanes, including a water based Polycrylic, an oil based Polyurethane, and another water based Polyurethane that was triple thick.
This allowed me to get a rough idea of what the table top would look like with the final finish applied. I say rough idea because it was a small section of wood and I did not spend as much time sanding it down as the rest of the table top. But it helped me identify that I would go with Minwax Satin Water Based Polycrylic to finish the desk.
Using a basic bristle painting brush, I applied the Polycrylic. I applied three coats, sanding the table top using 220 grit sandpaper in between coats. I applied three coats in total.
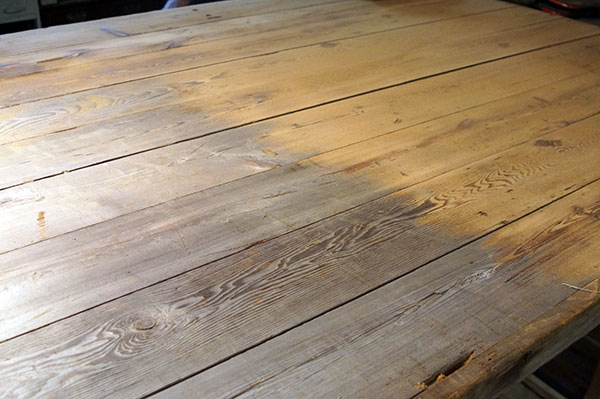
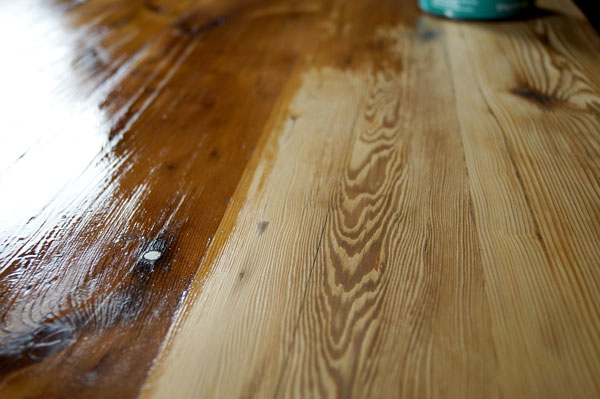
As you can see, the Polycrylic darkened the wood quite a bit, even more than I was expecting after trying it out on the scrap piece of wood. Originally, the idea for the table top was to go for more of a yellowish to light tan color. Which was close to how the table top looked before applying the finish. However, the end result is more of a light brown to honeyish color.
This was a bit of a disappointment at first, but since then, the color has grown on me. It still looks great, it just wasn't completely what I had in mind. The Polycrylic did do a great job of bringing out some of the unique and weathered features on the table top.

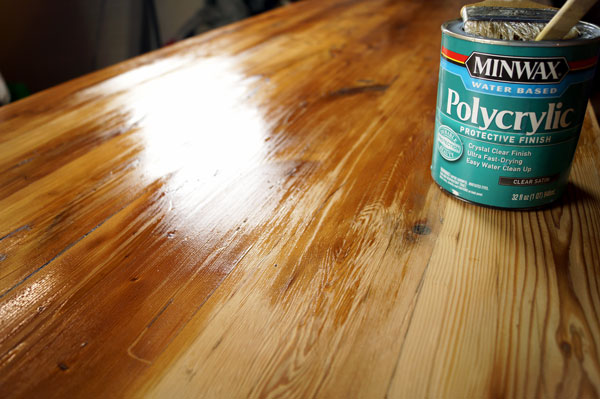
Above, is another shot of applying the finish where you can see the table top before and after the finish has been applied. Below, is a shot with the finish sanded using 220 grit sandpaper. Before applying another coat, I vacuumed and wiped this up completely.
In the meantime, while working on the desk table top, I was also spending time working on the desk frame.
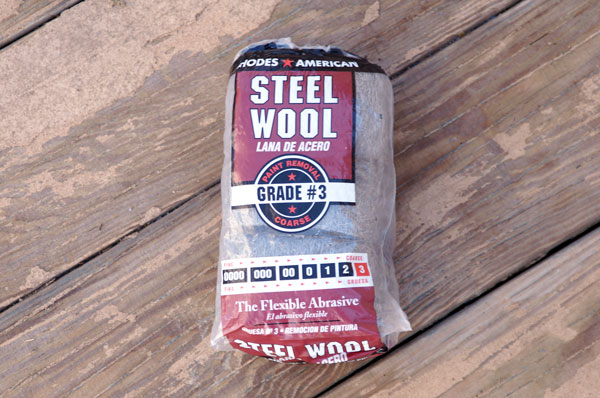
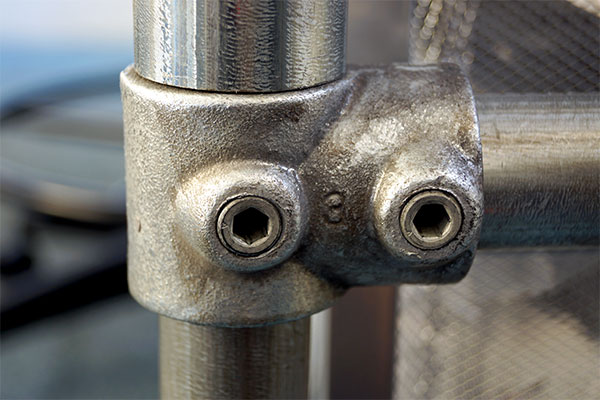
I wanted the reclaimed, aged look to continue throughout the entire desk and that included the desk frame. Now, I had seem a few ways to give pipe and fittings an aged look. I even tried a few different ways out that I found through the Simplified Building blog and other resources on the internet. Anyways, I finally settled on something that would give me the look I was going for.

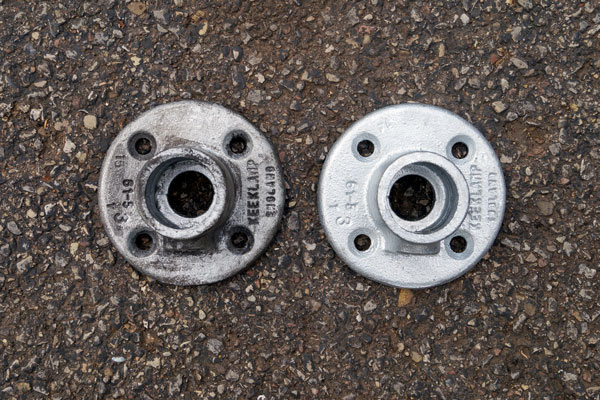
Using Perma Blue Liquid Gun and Steel Wool Pads, I was able to achieve the look I was going for. First, I started off by applying the Perma Blue Liquid Gun to the fittings and pipe. I did this in a few ways: by dipping the fittings in the liquid, pouring it straight on, and applying it using a rag.
With the Liquid Gun applied, I then scraped and scratched it off using the Steel Wool pads. I did this a few times to achieve the look.

Above, you can see one fitting that has been "aged" (left) and one that is completely stock (right). Below, is another comparison, this time from the top.
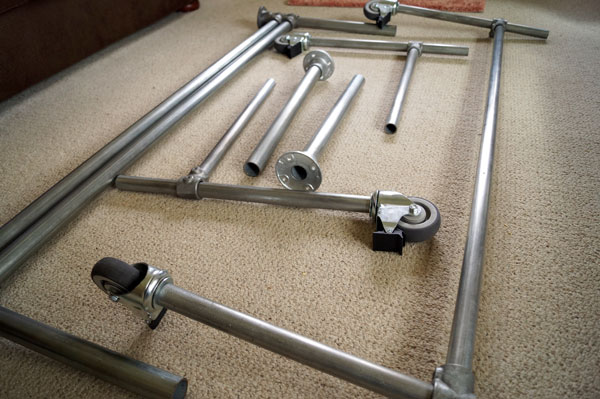
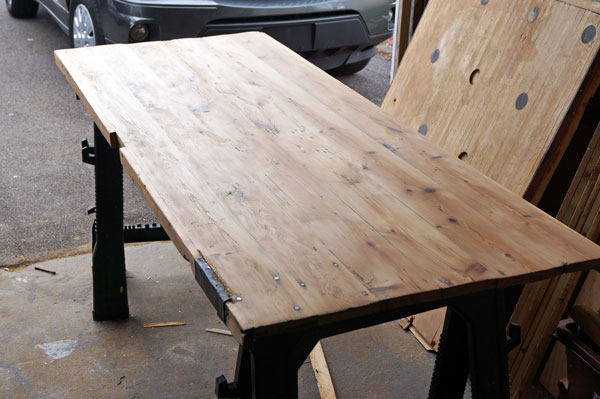
With the table top together and the pipe colored the way I wanted, it was now time to assemble the desk. I started off by assembling the frame in sections as pictured above. This process was fairly straight forward and only took me a few minutes. From there, I was able to completely assemble the frame.
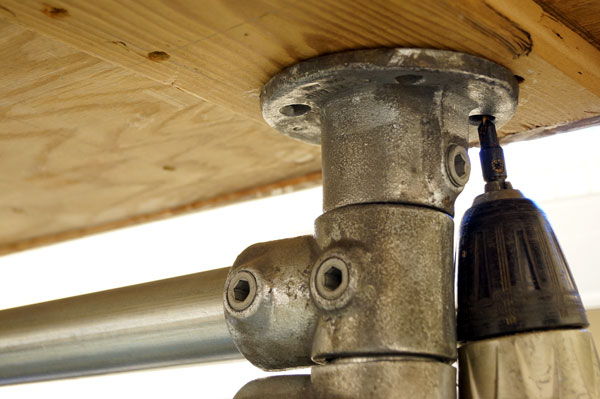
To attach the table top to the frame, I first placed the top onto the fully assembled frame. I then evenly spaced the edge and lined up the table top.
I then drilled into the wood to create a pilot hole and attached the top using Everbilt #10 x3/4 in Flat Head Wood Screws.
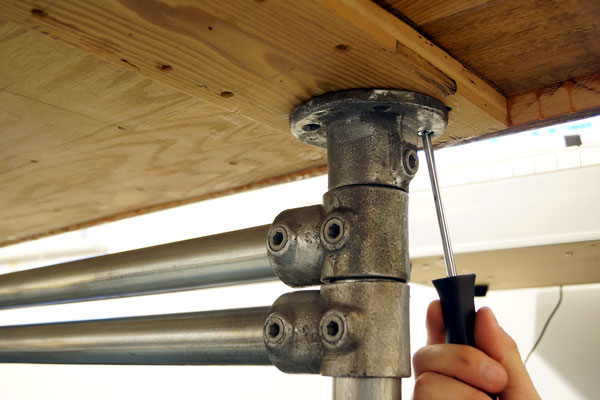
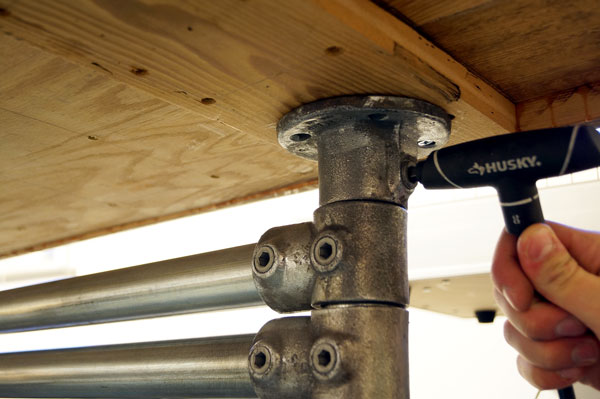

I did the same thing for attaching the flange fittings to the shelf that would run across the desk table top.

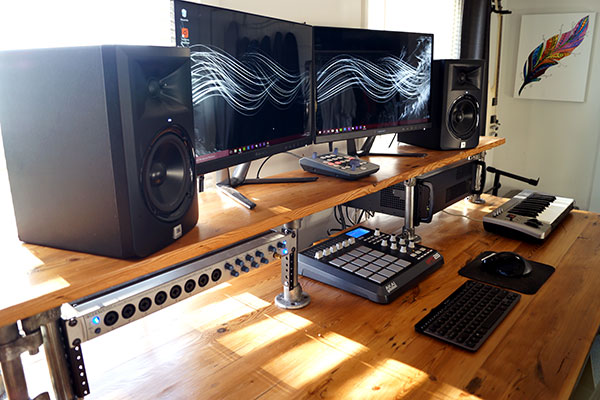
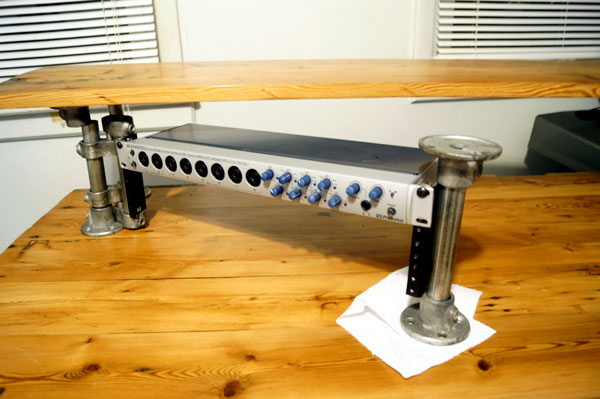
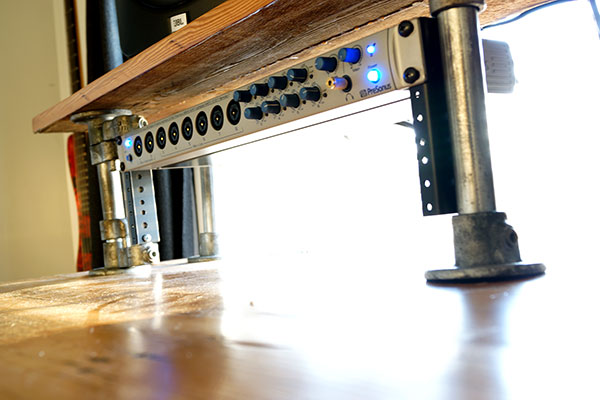
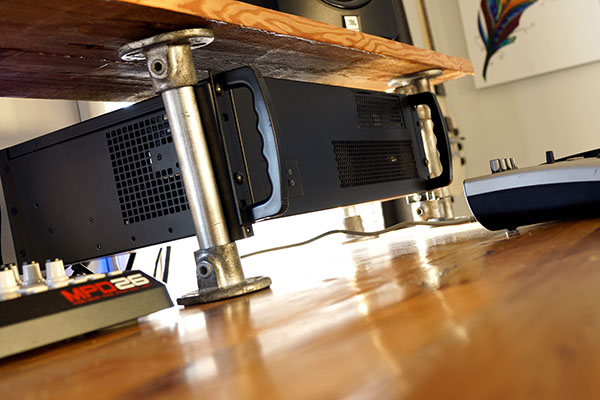
When attaching the shelf, I only mounted down the shelf supports to the outside of the desk. The shelf supports to the inside, were left completely freestanding, allowing the audio interface and rackmount computer to swing freely once mounted.
Below, you can see how the audio interface can swing out freely even when mounted to the pipe that supports the shelf. The same is true for the computer on the other side. In order to keep this from scratching the desk table top, I ordered some felt pads to place on the bottom of the flange fitting.
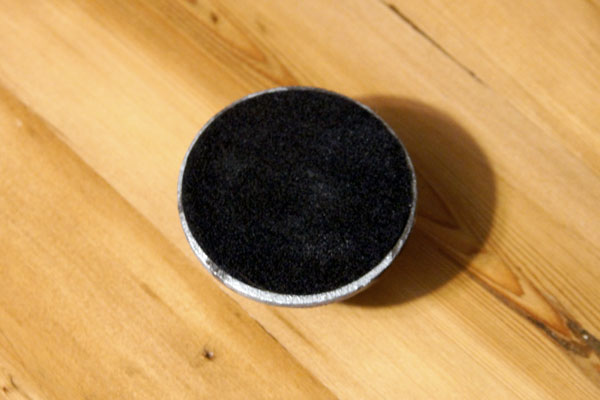
Above, is a shot with the felt pad placed onto the bottom of the flange fitting. To attach this pad, I sprayed it with a spray adhesive and simply pressed it onto the fitting.
That nearly covers the construction of the desk, but first, a few other things to note:
The office chair I'm using is an Alera EB-K Series Synchro Mid-Back Mesh Chair. In order to use this chair when the desk is placed at standing height, however, I needed to order a drafting chair extension kit to raise the height of the chair. Here is the one I used: OFM DK-2 9-12"H Drafting Kit. It works fairly well and I would recommend it. It comes with two extensions pieces: one that is 9" in length and another that is 12". I used the 12" extension since I need to sit so high when the desk is at standing height.
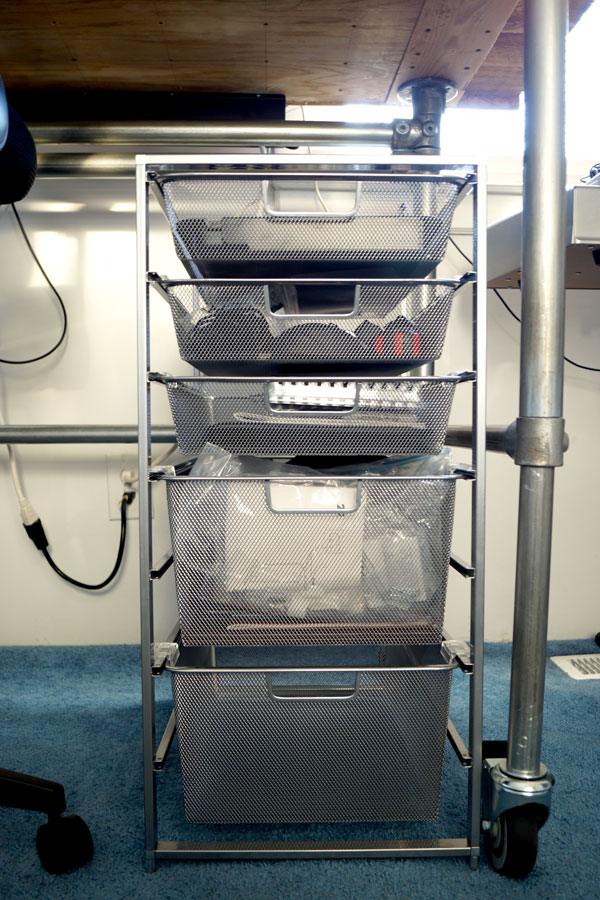
The drawers I used to pair with the desk to complete the look and give me some storage, are the Platinum Elfa Drawers from the Container Store. These drawers come in a few different styles: mesh, wire gird, and plastic. They are customizable in height, width, number of drawers, and sizes of drawers. They also have options for casters and drawers stops. I really like these drawers and would recommend them.
To mount the rack gear (the audio interface and rackmount computer) to the shelf supports, I used 3U Rack Rails and attached them using Everbilt #10 x 5/8 in Self-Drilling Pan Head Screws.
To manage the cables behind the desk, I bought these Cable Management Trays by Balt. I screwed them under the desk table top in the back using the screws that came with the package. I then put two outlets strips back there and ran all the power cords into these. This allowed there to be only two power cords coming out from the back of the desk and really made everything look much neater. I stuffed any excessive cables into the trays as well.
Well, that about wraps it up. If you have any questions about this project, don't hesitate to ask. Just leave them in the comments below and I will do my best to answer them.


![Rolling Recording Desk with Microphone Stand [Desk Week]](https://sbc-content.s3.amazonaws.com/catalog/product/cache/2/image/325x/040ec09b1e35df139433887a97daa66f/d/e/desk-week-music-desk_1.jpg)


