DIY Pull Up Bar - How to Build a Homemade Pull up Bar In Under 5 Steps!
Do you enjoy working out at home? Sometimes this is an easier and more convenient option than going to a gym. But unfortunately, at-home workout equipment isn’t always cheap.
Have you thought about building your own workout equipment? A DIY pull up bar is a great addition to a home gym. You just need an afternoon and a few basic materials to construct a pull up bar. Plus, you can save a lot of money by building your own.
If you don’t know where to start, don’t worry. In this post, we’ll cover everything you need to know about building an at home pull up bar. We will look at a few DIY pull up bar projects for inspiration before diving into the step-by-step instructions.
Most of these projects incorporate galvanized pipe and Kee Klamp fittings into the design, which helps reduce the overall cost of the project.
Types of Pull Up Bars
Before you start your own project, let’s discuss the different types of pull up bars. The main pull up bar designs we’ll cover include ceiling-mounted, wall-mounted, door-frame, free-standing, and floor-mounted structures.
- Ceiling-mounted: A ceiling-mounted pull up bar hangs from the ceiling. These work well in a garage or another open space where you don’t mind seeing your workout equipment. You will need to make sure the structure is securely attached to the ceiling rafters or joists for this to work correctly.
- Wall-mounted: Wall-mounted pull up bars are common and easier to install than ceiling-mounted. However, these bars can take up more space than other projects, so you need to consider this before designing your project.
- Door-frame: A door-frame pull up bar is relatively easy to create and doesn’t take up as much space as some of the other designs. You can also disassemble the structure as needed.
- Free-standing: Free-standing pull-up bars are not mounted to anything. These can be moved around to different areas of your house or yard, depending on where you want to workout.
- Floor-mounted: Floor mounted pull-up bars work well in an outdoor space. If you want to create a workout area in your backyard, consider mounting the pull-up bar into the ground and securing it with cement for stability.
DIY Pull Up Bar Ideas
Now that you are familiar with the different types of pull up bars, let’s look at a few projects for additional inspiration.
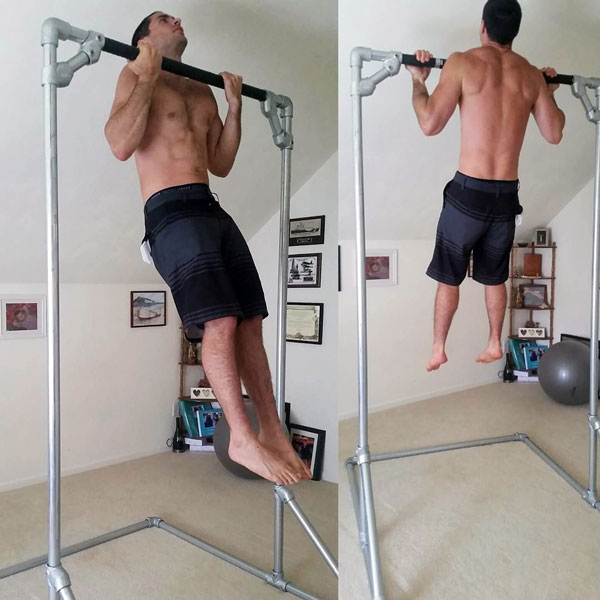
Charles created this free-standing pull up bar as he was training for a World Record Chin Up competition. This pull up bar is made with galvanized pipe and 90 Degree Elbow fittings, 30 to 60 Degree Single Socket Tee fittings, and Three Socket Tee fittings. Even though this bar isn’t attached to anything, it was sturdy enough for Charles to complete 5,546 chin-ups over the course of 6 months.

A crossfit gym in Saint Augustine, Florida constructed this multi-person pull up bar with galvanized pipe and Kee Klamp fittings. This bar is mounted to the wall with Flange fittings for additional support.
The owners of the gym said, “When we looked for a pull up rack solution we found quite a few systems but they were very expensive and not very flexible. We did some research and found Simplified Building and decided to go with the Kee Klamp system. Simplified Building offered great support and tech advice and the system was up in less than two days and is working great!”

Brian built this pull up station for the rehab room at his physical therapy office. Brain consulted with our design team before ordering the materials for this project.
Brian said, “I personally appreciate the personalized project. There are no leftover pieces, and everything fits as it should.” To create a similar wall-mounted pull up bar station, you will need galvanized pipe, Flange fittings, and Single Socket Tee fittings.

This door-frame pull-up bar fits perfectly into the space without needing to be mounted. This is a great option for dorm rooms or apartments. You will need to measure your door frame before designing your pull up bar to know what amount of space you are working with.
Our design team can help you figure out the exact pipe and Kee Klamp fittings you will need to create a similar door-frame project.
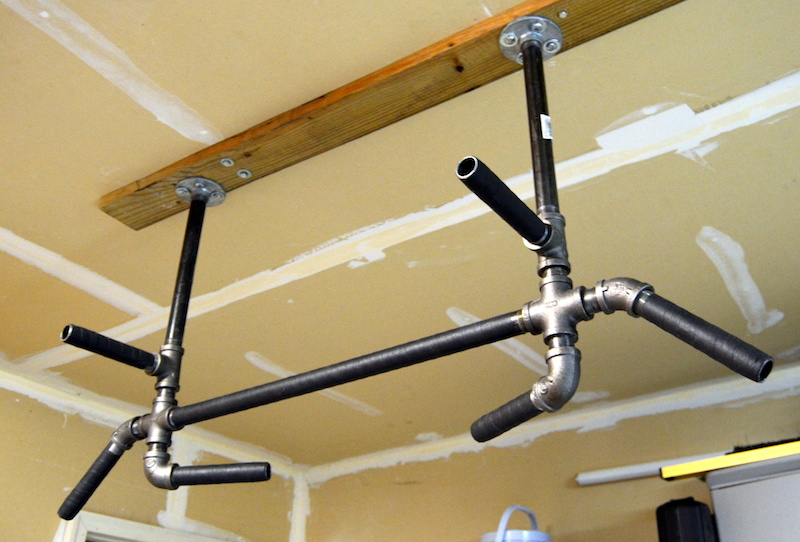
Chris built this four-position ceiling-mounted pull up bar for his garage. The variety of hand-grips allows Chris to perform a few different exercises. Use this bar as inspiration when you are creating your own pull up bar.
You don’t have to be limited to the traditional single horizontal bar design. Feel free to browse our selection of Kee Klamp fittings for some additional inspiration for the unique elements you can add to your own pull up bar.
Best Pull Up Bar Materials
As you can see from the projects above, galvanized pipe and Kee Klamp fittings are some of the best materials for a DIY pull up bar. In a few cases, including the ceiling-mounted pull up bar, you might also need wood planks for the design.
Overall, galvanized pipe and Kee Kamp fittings are great options because they are affordable and easy to use. You can also disassemble and rebuild projects made with these materials. This is especially helpful if you plan to create a free-standing or door-frame pull up bar.
How to Build Your Own Pull Up Bar
Now that you know more about DIY pull up bar projects, it’s time to start your own!
Step 1: Decide on the Type of Pull Up Bar You Want
The first step is to decide which style of pull up bar you will create. Do you want a wall-mounted or free-standing pull up bar? The choice is up to you!
Step 2: Gather Your Materials
Once you’ve decided on the style, you can gather your materials. You will likely just need galvanized pipe and Kee Klamp fittings. Feel free to talk to our design team if you are unsure of what materials you will need.
Step 3: Build Your Pull Up Bar
Of course, this step will vary depending on the style of pull up bar you choose to design. You will want to start by constructing the base and then attaching the horizontal bar. If you are mounting the structure, this should be the next step. Finally, test the bar to make sure it is stable and secure before using it.
Step 4: Enjoy Your New Pull Up Bar
After constructing your pull up bar, it is time to use it! Enjoy your new workout equipment, especially knowing that you saved money building it yourself!
Build Your Own Pull Up Bar Today!
Are you ready to build your own pull up bar? We know, as with any project, it can be overwhelming to know where to start. Hopefully, this post helped you find some inspiration for your own pull up bar project.
If you need some additional help, don’t stress. Our design team is ready to help! We offer free design assistance to help you get your project started. Once you are finished, feel free to submit pictures of your project on our site. We would love to see the pull up bar you create!


