DIY Obstacle Course: Build a Course in Your Own Backyard!
Have you considered building your own obstacle course?
Sure, this type of project might seem impossible to complete on your own. But with the right materials, it’s actually easier than you think.
Obstacle courses are fun for kids and can even be used as a team-building tool for adults. Plus, with the success of shows like America Ninja Warrior, obstacle courses are gaining popularity in the fitness world.
If you want to build your own obstacle course, you’ve come to the right place. In this post, we will look at some obstacle course inspiration and discuss how to use basic materials to construct this unique equipment. With Kee Klamp fittings and pipe, you’ll soon be on your way to building your very own obstacle course.
Kee Klamp Fittings and Obstacle Courses
Before you design and construct your obstacle course, take some time to think about what you want out of this equipment.
Are you looking for a stable, portable, strong, or adjustable course? If so, pipe and Kee Klamp fittings are the perfect materials for your project.
Kee Klamp fittings make a great obstacle course because, unlike traditional threaded pipe, Kee Klamp fittings can be adjusted. This means you can change the shape and structure of the course to adjust the difficulty.
You can also break down these structures to make a portable obstacle course. This is especially great if you want to design a course for a traveling event, like the obstacle courses used in the Spartan Races.
Just because these courses can be adjusted and broken down doesn’t mean they are unstable. In fact, Kee Klamp fittings can create a sound obstacle course that can be used by multiple people at once.
Since Kee Klamp fittings are made with a galvanized finish, they are also less prone to rusting than other materials. This makes them a perfect option for structures that will be used outside in all types of weather.
Now you know that Kee Klamp fittings and pipe can be used to create durable, adjustable, and portable obstacle course equipment. Let’s look at a few projects so you can gather some inspiration for your own build.
DIY Obstacle Course Ideas
This project was created for the Miami Freerunning and Parkour Academy. It could easily be incorporated into an intense obstacle course. To create a similar project, gather Kee Klamp fittings, pipe, and 30 to 60 Degree Single Socket Tee fittings for added stability. We recommend using a rigid and thick pipe for the longer sections of the course.

Anthony created this simple Seesaw balance structure for an obstacle course race company. He didn’t need that many supplies and you could easily replicate this for your own obstacle course. You really just need some wood planks, pipe, 90 Degree Elbow fittings, and Single Socket Tee fittings.
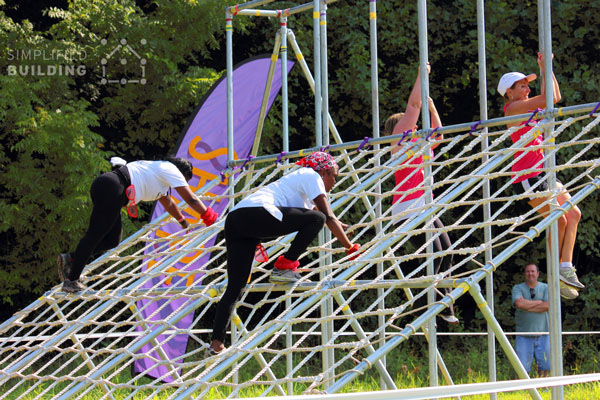
Are you sensing some American Ninja Warrior inspiration here? This project was created with pipe, netting, Single Socket Tee, 90 Degree Elbow fittings, The great thing about using Kee Klamp fittings is that you don’t need to worry about stability. Multiple people can use this structure at once without any fear that it will break.
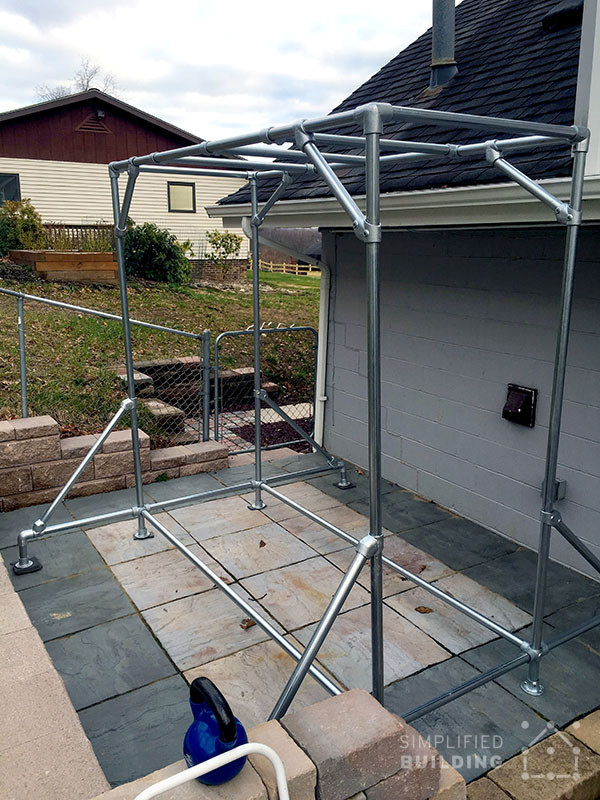
Monkey bars are perfect for at-home obstacle course workouts or as part of a larger event. You could create a freestanding piece, like the one pictured above that was created with using the Flange, Single Socket Tee, Side Outlet Elbow, and 30 to 60 Degree Single Socket Tee fittings.
This structure could also be broken down and transported if necessary. Even if you decide to leave it as a stationary piece, make sure to use the angled supports since these add an extra level of stability to the structure.

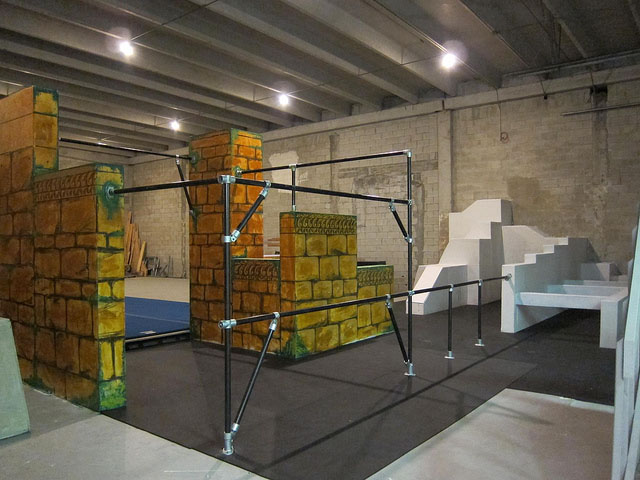
If you are looking for a more permanently-mounted piece, consider mimicking this option. This course was created for an indoor parkour park. You can use the Adjustable Angle Base Flange, Standard Raining Flange, or Flange to mount this to the wall or floor. This is a great way to add a long-term obstacle course to a gym.
How to Build Your Own Obstacle Course
Did you find some inspiration? Great, now let’s get started on the project.
Below are some simples steps that will help you create your own obstacle course.
Step 1: Design Your Obstacle Course
Spend some time thinking about and researching obstacle courses. What are you looking for in your course? Do you need it to be adjustable? How often will you want to break it down? How large does the course need to be?
Think through these questions to help figure out exactly what you are going for.
If you need help coming up with the perfect design, our team offers free design assistance!
Step 2: Gather Your Supplies
After you’ve designed your obstacle course, its time to think about the supplies you need. For nearly any course, you can use a variation of pipe and Kee Klamp fittings to create your design. With over 100 types of fittings available, Kee Klamp allows you to create any type of obstacle course you can imagine.
Step 3: Build Your Course
Once you’ve gathered your supplies, it’s time to get to work! With pipe and Kee Klamp fittings, the building process is fairly simple and straightforward. In most cases, all you will need to assemble your project is an Allen Wrench or hex key.
Depending on your design, it should only take a few hours to get your obstacle course up and running.
Step 4: Enjoy!
Now that you’ve designed and created your own obstacle course, have some fun! And if you want, you can easily adjust or transport your new obstacle course as needed.
Build Your Own Obstacle Course Today!
We know that it can seem overwhelming to create your own obstacle course. Hopefully, this post helped you see that, with the right tools, creating an obstacle course is possible. Soon you could be achieving your own American Ninja Warrior dreams!
If you are still not sure where to start, don’t stress. Our design team is here to help! We offer free design assistance to help you get your project started. You can also browse our collection of projects for even more inspiration. Once you are finished, feel free to submit pictures of your project on our site. We would love to see the obstacle course you create!


