DIY Parkour Gym Equipment: The Ultimate Guide to Pipe Structures
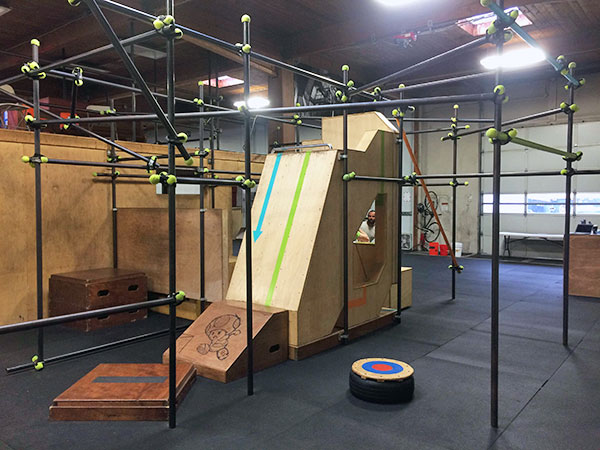
Parkour is a physical and demanding sport. Not just on you and your body, but the structures that you practice on. If you're thinking of building your own Parkour gym equipment, you need to be prepared to build something that will be able to handle the type of abuse it will go through. Pushing, pulling, swinging, jumping, all put a tremendous amount of stress on a structure. You need to be sure that your Parkour equipment can handle it.
This post is meant to be a guide for those of you thinking about building your own Parkour gym equipment. As a company that has helped many Parkour enthusiasts as well as full-fledged Parkour gyms to design and build their own equipment, we know what it takes to design equipment that lives up to the abuse it will go through. Important topics such as safety, stability, building material, pipe size, adjustability, configuration, and portability, are all topics we will cover in-depth.
While we believe Kee Klamp is a superior material to build Parkour structures, we will cover what you need to know if you build your equipment with wood or even any other type of pipe and pipe connector.
So without further ado, let's jump into it with the first and most important topic you should consider before starting your build, Safety and Stability:
Keeping Your Structure Safe
The first thing you need to consider before starting to build your parkour structure, is safety. Whether you're building it for yourself to practice in your backyard, to introduce your children to the sport, or you're planning on building a full-fledged parkour gym, you need to be certain that the equipment you build is, above all, safe.
An unsafe piece of equipment can lead to a nasty injury, and if you're a gym owner, a nasty lawsuit. You need to keep yourself and your gym attendees safe by building a structure that is stable and strong enough to support the movement and weight bearing down on it.
If you're building the structure with pipe, there are a few ways that you can add stability and strength to the structure to ensure it will be safe:
Choose the Correct Pipe Size
The first will be to consider the size of the pipe. Not just the diameter of the pipe but the thickness of the interior wall as well.
A larger pipe diameter can help to create a stronger and more stable structure. However, using pipe with a larger diameter can come at cost of making the structure more difficult to use. A larger pipe diameter can be harder to grip and move freely on. A solution to this could be using varying sizes of pipe within the structure.
Pipe Diameter Sizes
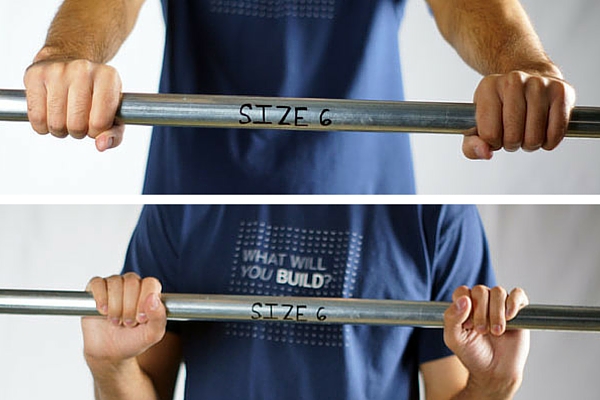
Above is a picture of Gator Tubing Size 6 Pipe (1" Nominal Bore, 1.315" Outer Diameter).
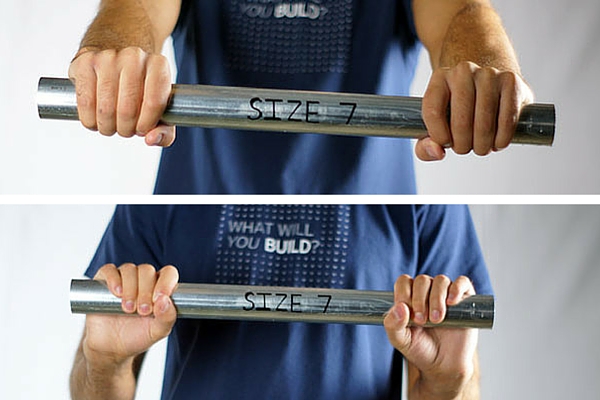
Above is a picture of Gator Tubing Size 7 Pipe (1-1/4" Nominal Bore, 1.660" Outer Diameter).
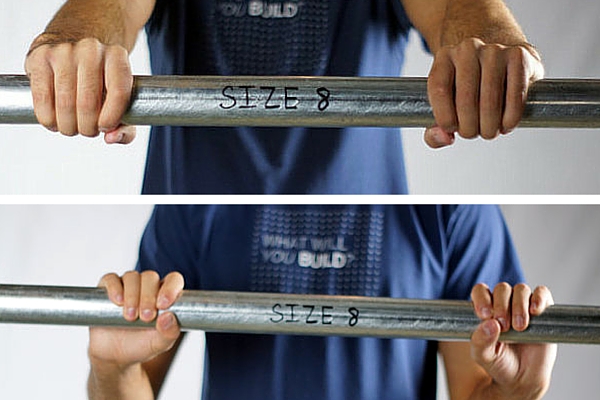
Above is a picture of Gator Tubing Size 8 Pipe (1-1/2" Nominal Bore, 1.900" Outer Diameter).
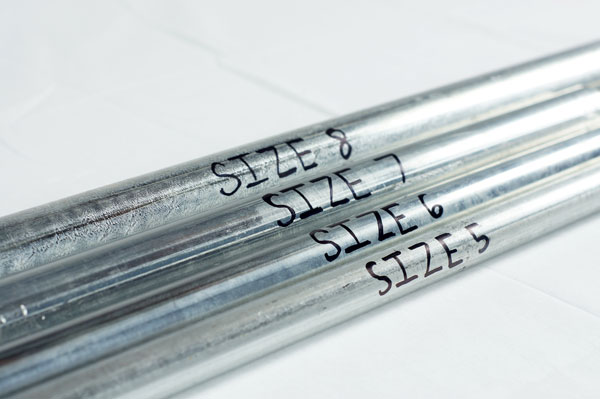
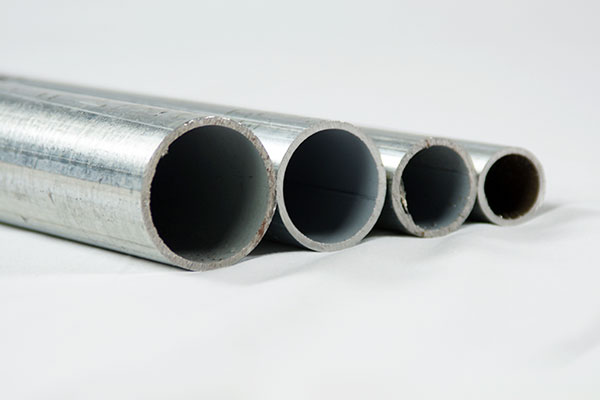
Using a pipe with a larger diameter in certain areas of the structure such as the base, corners, or any other areas that are less likely to be used for movement can help to strengthen the structure while using pipe with a smaller diameter in places where you will actually grip and move on the structure will make it comfortable to use.
The Single Socket Tee would be best for this type of application as it comes in variations that allow you to join different sizes of pipe. For instance, you can join a size 7 pipe (which has an outer diameter of 1.660") in one direction while joining a size 6 pipe (which has an outer diameter of 1.315") in the opposite direction. In general, a size 6 or 7 pipe will be easier to grip while a size 8 pipe will help to make the structure more stable.
Even more important than the diameter of the pipe, may be the thickness of the pipe. The interior wall thickness of the pipe can make a big difference on the safety and stability of the structure. A pipe with a thicker interior wall such as Schedule 80 pipe, rather than Schedule 40 pipe, can make the structure more rigid and is often recommended by Parkour gyms:
"Generally most Parkour programs are using either 1 1/4" or 1 1/2" nominal pipe (1.66" or 1.9" OD respectively) and we recommend to always upgrade to Schedule 80 (greater wall thickness). Usually it's not that much more expensive and it will make your pipe last much longer without bending. We use 1 1/2" Schedule 80 pipe on 7' - 9' spans at Parkour Visions and have only permanently bent one bar in the last 4 years (an 8' span taking a large drop precision at a competition)"
Tyson Cecka - Parkour Visions
"Not all pipe is made the same. We ONLY use Schedule 80 pipe. Any structure I've seen with lengths greater than 4 feet who tried to cut costs by using Schedule 40 pipe has proven to be a structural nightmare. Tons of bending."
Charles Moreland - RocPK
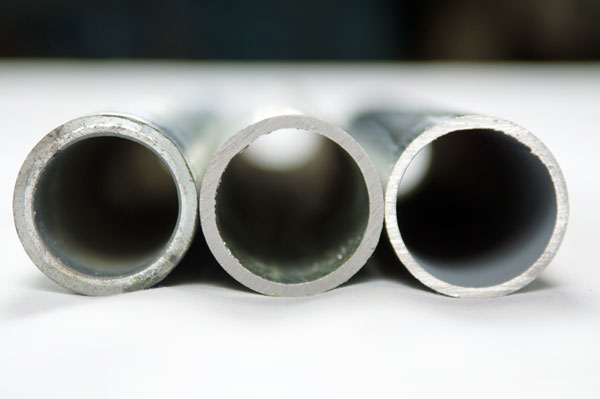
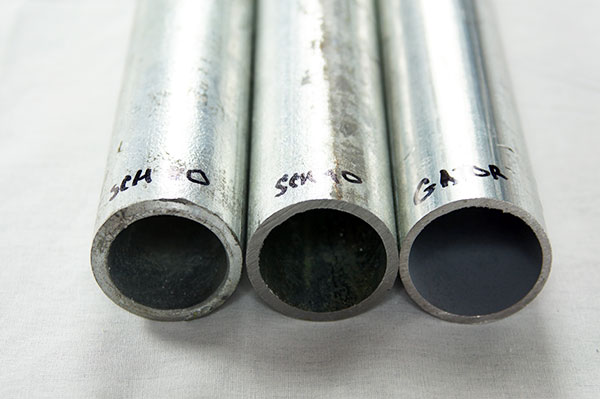
The images directly above and directly below show a comparison of Size 7 (1" Nominal Bore, 1.315" Outer Diameter) Gator Tubing, Schedule 80, and Schedule 40 Pipe. Starting from the left is Schedule 80 pipe, then Schedule 40 pipe, and finally Gator Tubing. Notice the inner wall thickness of each. The thickness of the inner wall may seem slight but it does make a big difference. Schedule 80 is quite a bit more heavier and more rigid than Schedule 40 pipe.
Include Triangles
Another way to make the structure safer and more stable, is to add triangles to the structure.
When in doubt, the triangle will be your best friend. The triangle is the strongest shape and when used in your structure, it will help to reduce instability and improve strength. Use triangles at the base and corners of the structure.
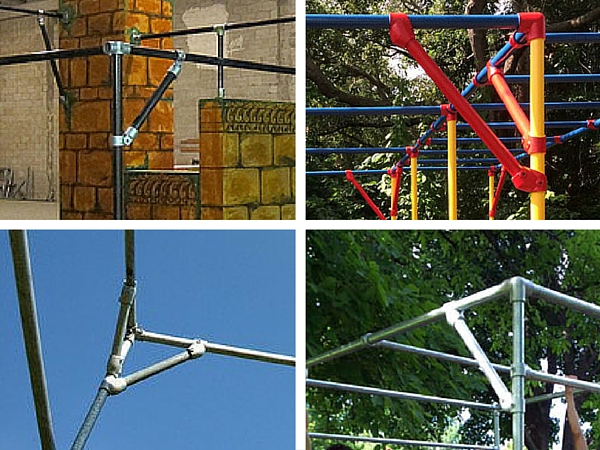
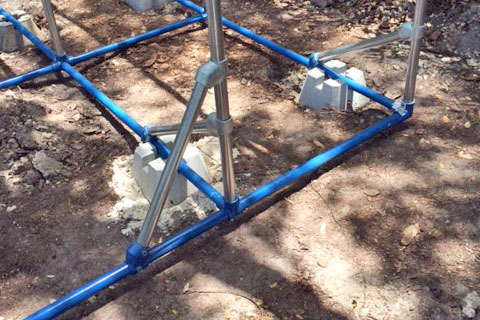
A triangle can be created using either the Single Swivel Socket, the 30 to 60 Degree Single Socket Tee, or the 45 Degree Single Socket Tee. In the structure below, two 30 to 60 Degree Single Socket Tee fittings were used to create each of these triangles.
Mount it to the Wall or Ground
And finally, one more way to provide stability to the structure will be to anchor it to the wall or ground. While, it's possible to build a solid structure that is completely freestanding, mounting it to a surface will only help to increase the stability and strength of the structure.
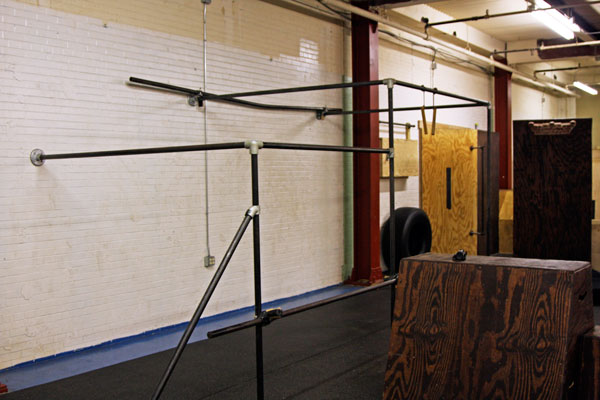
Notice in the picture above how the structure is mounted to the wall to provide for extra stability.
Using the Flange, Standard Railing Flange, or the Adjustable Angle Base Flange, you can mount the structure to the wall or ground. Below you can see each pictured respectively.
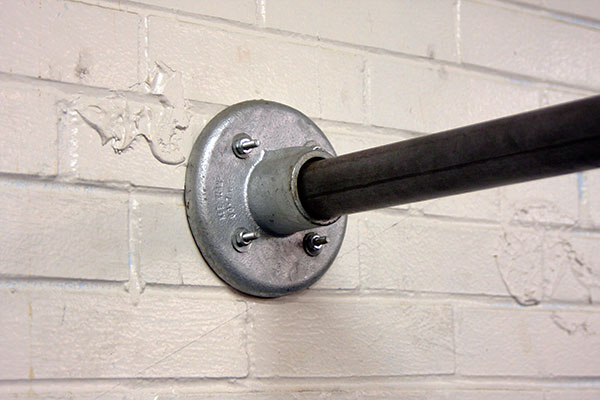
Above is the Flange fitting.
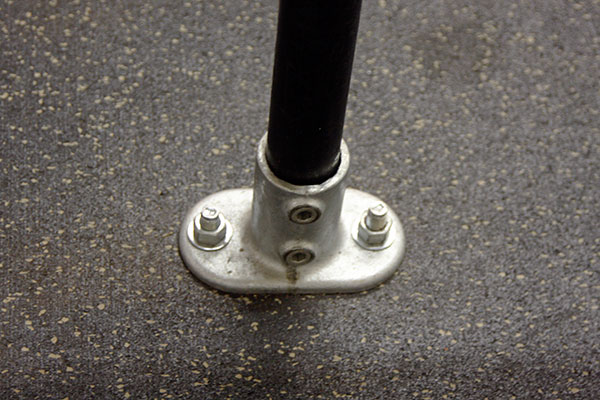
Above is the Standard Railing Flange fitting.
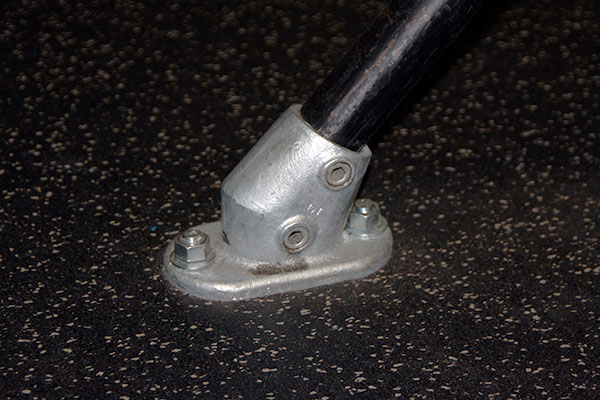
Above is the Angle Base Flange fitting.
Material
Next you want to consider the material you will be using. Deciding on a material to use might depend on the physical requirements of the structure as well as the location it will be used.
If the structure will be used mainly outside, you will need to be aware of how the material will react to the elements. Untreated pipe can rust over time, and fairly quickly at that if it's in a highly corrosive location such as rainy environments or places close to the ocean.
To combat this, galvanized fittings and pipe are a good solution. Compared to traditional untreated pipe, galvanized fittings and pipe are corrosion resistant and are known to fight off the deadly signs of rust for many years.
Wood is also susceptible to harsh weather as it can rot and deteriorate over time. Which not only eats away at your equipment, it's an added cost if you need to replace or rebuild the structure. It's also a safety hazard and could potentially lead to an injury if the structure is too far gone and not immediately dealt with.
The feel and texture of the material is important too. With wood you need to ensure that it is sanded down properly and completely smooth. Rough surfaces and edges can lead to splinters and even nasty cuts or abrasions.
And finally, you will need to consider the difficulty of using each material to build your structure.
If you're not experienced in building with wood, it may be a challenge to build a sufficient piece of equipment. Wood requires some expertise and will most likely require power tools to build anything with it. Which is again an added cost you will need to factor in.
On the other hand, using pipe fittings does not require any prior expertise and requires the use of just one tool, an Allen Wrench, to assemble it.
Pipe Connector Options
There are three main types of pipe connectors that we see used in Parkour pipe structures: Threaded Pipe fittings, Scaffolding Clamps, and Kee Klamp fittings. Each have their pros and cons, so let's talk briefly about each:
Threaded Pipe Fittings
We've talked about threaded pipe fittings versus Kee Klamp before. We have an in-depth look at the pros and cons of building with each here. The article focuses on building furniture with each but the principles still run true for any structure.
To cover threaded pipe fittings briefly, as compared to other connectors, they are much less expensive. For example, at the time of writing this article, a plumbing flange fitting at Home Depot for 1/2" pipe is $4.53. However, a Kee Klamp Flange fitting for the same size pipe is $11.21. Threaded pipes fittings are also much more accessible as they usually can be picked up at your local Home Depot or Lowes.
One of the biggest drawbacks to using threaded pipe fittings are that they are much harder to work with. You either need to get the exact size pipe you need from the hardware store or learn to cut and thread the pipe yourself, which will require special tooling such as a pipe threading kit. They also don't allow for adjustability.
Scaffolding Clamps
Another popular pipe connector for building Parkour structures are Scaffolding Clamps. Scaffolding Clamps allow for some adjustability and are easier to use than threaded pipe fittings. However, Scaffolding Clamps have large bolts that stick out. This can make using the structure rather dangerous.
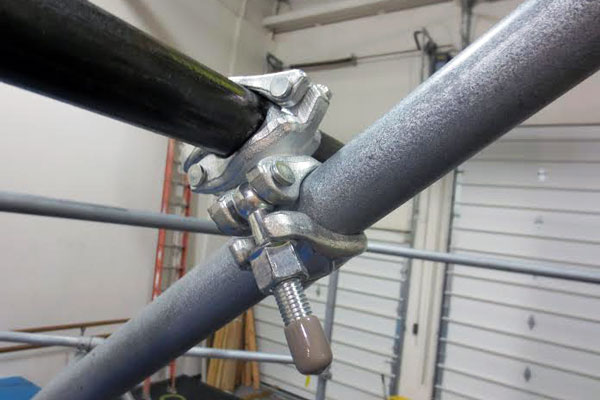
One solution to this is using tennis balls to cover the clamps:

Another option, as used by one of our customers RocPK, is to use a combination of different clamps:
"At RocPK we use a mix of Kee Klamps and scaffold clamps. Generally, I will build my base or outer shell out of Kee Klamps, and put up additional bars with scaffold ones."
Charles Moreland - RocPK
Kee Klamp
Finally, the third option is to use Kee Klamp fittings. Kee Klamp fittings provide the most flexibility and options. The fittings can be adjusted by loosening and tightening the set screw to the fitting. Kee Klamp also offers over 80 different types of fittings to help build pretty much any structure imaginable. However, Kee Klamp fittings are more expensive as compared to the other pipe connectors. They are also not locally available, meaning you need to order them online.
Adaptability and Configurability
Over time your needs will change, you will get bored with your structure, and you will begin to plateau. So future proofing your structure from the start will make a lot of sense. What I mean here, if you are unfamiliar with the word future proofing, is to build the structure with the future in mind. If ever, you will want to change or rebuild the structure, it will make sense to plan for this.
If you are using wood as your main building material it may be difficult to change the structure without completely starting over. That's an added cost of more material, more planning, and more time.
A benefit to building your structure using fittings and pipe is that it's adjustable and configurable. It's adjustable in that you can easily adjust the structure to a specific height by loosening the set screw that keeps the fitting secure, adjusting the fittings, and then retightening it down.
This would be great in situations where you want to build swinging bars. You could change the height of these bars whenever you want.
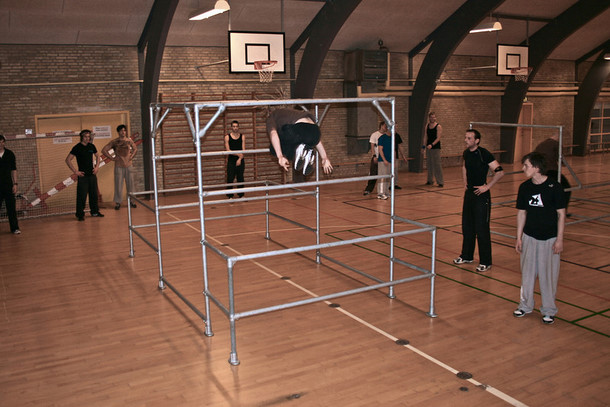
The structure below is a prime example of this. Notice the intersecting bar to the right of the image. You can adjust the height of this bar anywhere in that space between the top and bottom of the frame. This makes it easy to change up the structure or to set it for different height users.
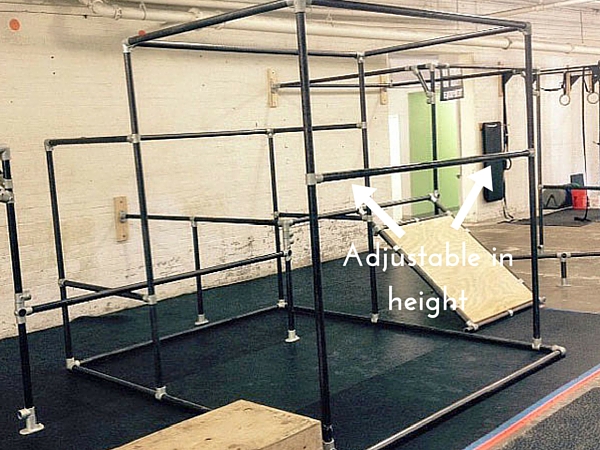
Pipe fittings also allow for configurability. What I mean by this is that you can configure it in many different uses. Since the whole structure can be disassembled and reassembled by untightening the set screws to the fittings, you can use the same fittings and pipe to build a whole different structure. Or you can easily add on to the structure, making it expandable.
Portability
While portability may not be the number one concern in building your parkour equipment, it's still something to consider. If you have any desire to haul around your equipment, you will want to make the design portable.
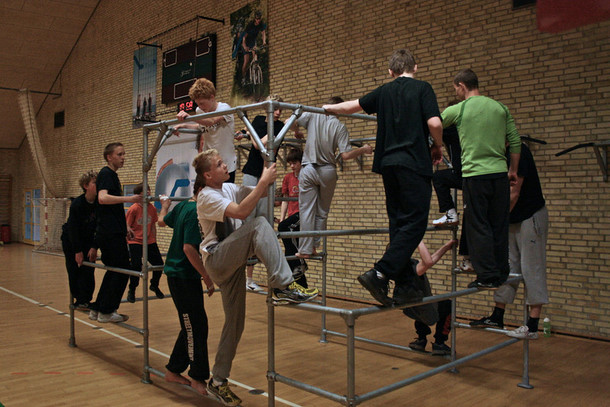
Parkour structures can be extremely heavy. Even vault boxes built from wood can weigh nearly 60 lbs. So it can be a challenge to transport equipment. However, a structure built using pipe fittings can allow the structure to be portable. Since the whole structure can easily be disassembled and then reassembled, the structure can be taken apart completely or in sections to make it easier to transport.
The video below shows Jump'In City, a Parkour facility in France, using their portable Parkour structure built using Kee Klamp fittings and pipe. They also discuss how the structure is portable yet still very rigid. The video is in French but has English subtitles.
Portable Structure Examples
Well that's all we have for you. While, we have done everything we can to make this article as in-depth as possible, there still may be other points we may have missed. Let us know in the comments below your experiences in building parkour equipment and feel free to reach out to our projects team to answer any specific build questions you may have. Our team is experienced in designing parkour structures and can help you design your own structure for free or address any concerns you may have.



![Portable Parkour Structures Built with Kee Klamp [Video]](https://sbc-content.s3.amazonaws.com/catalog/product/cache/2/image/325x/040ec09b1e35df139433887a97daa66f/e/n/entry_1205_1.jpg)
