DIY Modern Coat Rack with Floating Shelves
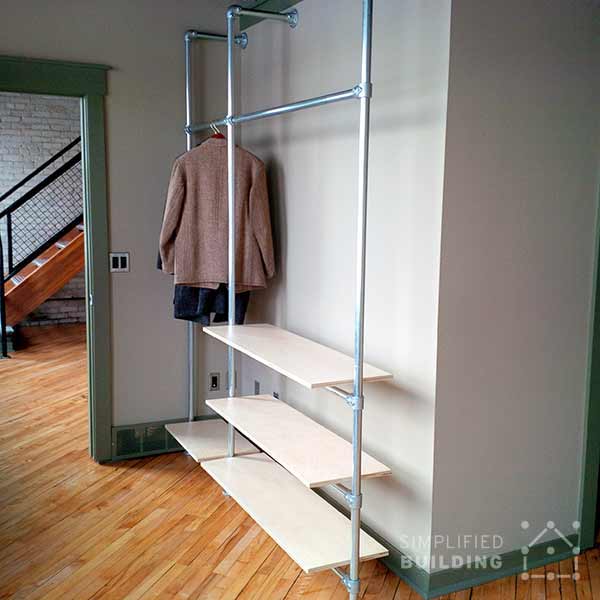
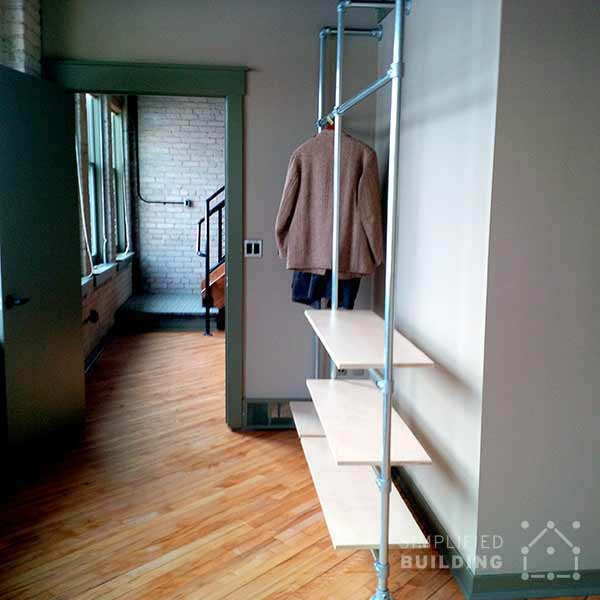
Check out this modern coat rack, with floating shelves, that Dan from Grand Rapids, Michigan built for the entryway in his home. The coat rack frame is built entirely using Kee Klamp fittings and pipe which is then mounted to the ground and wall. In this article, we're going to cover the details of Dan's coat rack, the fittings you'll need, and how to build your own.
Project Details
Like I mentioned above, the frame was built entirely using Kee Klamp fittings and pipe. Most interestingly, Dan utilized the Rail Support fittings to create the floating shelves. The fitting slides onto the pipe frame and has a flange for mounting the shelves. This helps to achieve the "floating" look.
The coat rack/shelf combo features solid walnut boards for the shelving that Dan bought from a local Woodcraft shop. He was able to have the shop cut the boards to length and simply add them to frame when complete.
Dan loved the look and functionality of Kee Klamp so much, that he even went onto build another rack in his bedroom for hanging clothing. He has since moved but the new owners liked the racks so much that they requested they remain in the home when they moved in.
Fittings Needed to Assemble the Coat Rack
Below, are all the fittings that you will need to assemble the coat rack/shelf combo. The flexibility of Kee Klamp allows you use any dimensions you like (for the lengths of pipe). Therefore, the rack is configurable in height, width, and depth based on the dimensions you specify.
Additionally, the design can be modified to include more or less shelving (feel free to contact our projects team for free design assistance to come up with a design that will work for you). With that said, the fittings and proceeding assembly steps will focus on Dan's specific design.
Fittings needed:
- 8x Single Socket Tee fittings
- 6x Flange fittings
- 3x 90 Degree Elbow fittings
- 2x Two Socket Cross fittings
Now let's move onto how to assemble the coat rack.
How to Assemble the Coat Rack/Shelf Combo
To assemble the coat rack, follow the diagram below. Further detail is also included below the image.
As with any project that uses Kee Klamp fittings, the exact order in which you assemble the project will depend on how you would like to approach the assembly process. However, we have provided the recommended order of steps.

- First, start by assembling each of the three uprights. These will later be joined together to complete the coat rack frame. 1A gives a closer look at each of the fittings used on each upright. Starting at the 1st upright on the left, it will use 2 Single Socket Tee fittings. The upright in the middle will use 2 Two Socket Cross fittings and 2 Single Socket Tee fittings. The last upright on the right will use 4 Single Socket Tee fittings. Each upright will use a 90 Degree Elbow fitting, at the top of the frame, to cap off the upright and change direction. Finally, there will be a Flange fitting at the top and bottom of each upright.
- At this point, the uprights should be complete (as pictured in Step 2) giving you three complete sections.
- You can now join together the three sections. You want to have someone help you out at this point, and going forward, since the structure will start to get rather heavy. Each horizontal support will utilize 2 Rail Support fittings. So make sure to slide these on before connecting the uprights together. The Rail Support fittings will allow you to attach the shelves to the pipe frame.
- With the uprights connected, you should now have a complete frame as pictured in Step 4.
- Now it's time to attach the shelves. First, position the shelves in place.
- Then, using the appropriate hardware (likely wood screws) attach the shelves to the frame. The Rail Support fitting has a flange with two holes in it for mounting the shelves. This is best illustrated in Step 6.
- Finally, you can mount the coat rack combo to the wall. The Flange fittings at the top of the frame must be mounted to the wall to keep the coat rack from tipping over. Mounting the Flange fittings (at the base) to the ground is optional. However, it will keep the structure more stable, so it is recommended. With the frame mounted, the coat rack is now complete.
If you have any trouble assembling the coat rack, don't hesitate to reach out to our projects team for help (projects@simplifiedbuilding.com). Our team is experienced in working with Kee Klamp projects and can help you with designing and building your own. Finally, we do offer a few coat rack kits for a simpler approach, try browsing our selection to see if there is a fit for you.
Did you enjoy this article? Let us know in the comments below what you thought of Dan's coat rack and be sure to sign up to our email newsletter to receive updates on future projects like this one.


