How Much of the Pipe Goes Into a Kee Klamp Fitting?
This is a question we get often that sounds like it has a simple answer, and indeed it does. However, over the last 8 years of working with this product, I’ve come to learn that the short and simple answer doesn’t necessarily answer the myriad of other concerns and inquiries that initiated the original question.
Whether you are an engineer specifying an OSHA guardrail, a DIYer designing your own desk for your home office, or a boutique owner desiring to fill your store with pipe clothing racks, my hope is to summarize the entirety of this question into a manageable response.
Not all sockets are the same.
The reason one might stutter when answering this seemingly simple question is that not all the sockets on our fittings are exactly the same.
The reality is that each fitting is engineered and designed to withstand certain loads and be paired with specific pipe sizes. So if the question is brought up due to a concern with structural capabilities, we can quickly put your mind at ease with proof of the strength of Kee Klamp fittings.
The fittings allow the pipe to fit snugly into the socket enough to give the set screw room to do its job. Once that set screw is tightened down properly to its designed torque, it will have an axial load rating of 2,000 lb. That's a lot of weight and frankly is unnecessary for most applications.
However, oftentimes the concern isn’t of structural capabilities, it's of limited space. You need to make sure the thing you are building will fit in the space you have available.
What is my outside to outside dimension going to be?
This is crucially important when working with home offices, closets, or store displays. You have a finite area in which these desks, tables, clothes racks, and/or shelving can fit. Instead of cutting pipe yourself, you’d prefer everything gets shipped ready to be installed. Fortunately, that is exactly what we do.
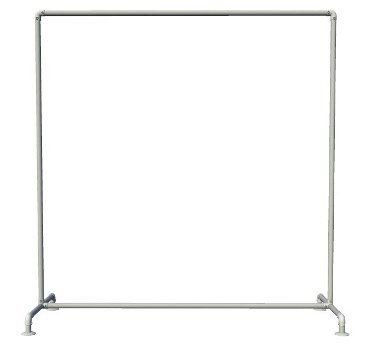
Let’s say you have a closet that measures 60 inches and you’d like to put up a hanging bar for clothes. The simplest design is to purchase 2 x 61-6 flange fittings and a section of pipe. Now, you need the pipe to be long enough to span the 60 inches, but shortened to account for the flanges themselves. What do you do with this?
I could tell you down to the millimeter what the thickness of the flange will be. However, to simplify, take 1 inch off your 60 inches and purchase a 59-inch pipe. There is up to ¾” of play in each fitting that the pipe can pull out and still make full contact with the set screw. Given that cutting the pipe down to the exact length including the flange thickness would make installation next to impossible, I’d suggest shortening the pipe by an inch and saving yourself the hassle.
In other cases, your design will have vertical pipes on the outside of the frame. This will add another step to the measuring, however, we can simplify this for you.
If you are using common Kee Klamps with sockets, two vertical pipes, and a pipe running horizontally between them (as shown in image below), there is only one thing you need to keep in mind.
Assume every horizontal pipe makes contact with the vertical pipe.
Simple, right? Well, let me explain. With this knowledge, all you’d need to know is the outside diameter of your pipe.
If every pipe is touching the other pipe inside each fitting, (though at times they won’t be touching like when using the 15 elbow fitting), then the only number you need to be aware of is the outside diameter of the pipe. You’d add that width of your pipe to the length of your horizontal, giving you the true outside to outside diameter.
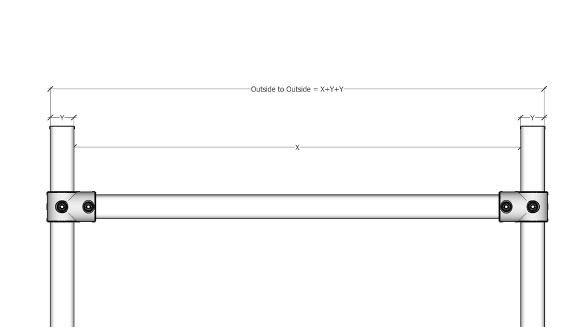 In practice, let’s say you have a desired outside to outside dimension of 36” and you are using 1 ¼” sch 40 pipe. (Having trouble understanding pipe sizes? Check out this pipe sizing guide!)
The outside diameter of the 1 ¼” sch 40 is 1.66”. Using my formula, if I start with a 36” pipe the formula would look like:
36 + 1.66 + 1.66 = 39.32
This will not fit in my desired space. By switching the formula around we can easily figure out what the length of pipe needs to be. The formula changes to become:
Outside to Outside - Y - Y = X
Or …
36 - 1.66 - 1.66 = 32.68
32.68 is not a friendly number and may leave you feeling a bit more confused. However, going back to what I said earlier about the amount of play inside each fitting, I’d simply round down to the nearest ¼ of an inch. My final answer would be 32.5 inches for simplicity, knowing that I have plenty of room to adjust if needed.
Keep in mind that this does not account for the fittings on the outside edges of the pipe. If that becomes a concern, you’d simply lessen your desired width down by an inch and repeat the formula above. In that case, your desired outside to outside width be 35 inches to ensure the structure will fit inside that 36-inch space.
Also, if you are using flanges on the floor or wall as shown below, you’ll need to account for the flanges as well. Knowing your center to center dimensions will help with that.

What if I need to know center-to-center dimensions?
Center-to-center has an easier formula with a slightly more complex explanation. See the formula below:
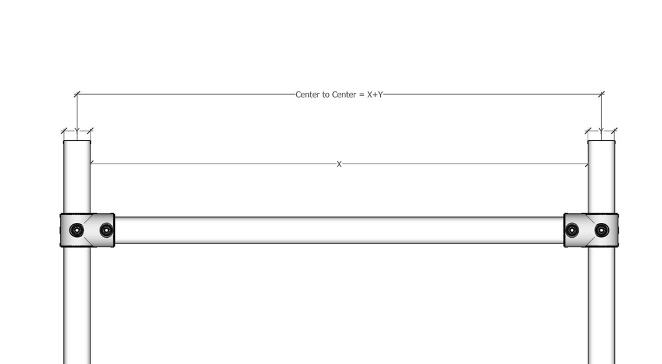
This formula accounts for half of the pipe outside diameter on both sides of the horizontal pipe. Fortunately, when you take half of a number then times it by two, you get right back to your original number. Here is an example:
Let’s say you need 72 inches center to center and you are using 1 ½” sch 40 pipe. 1 ½” sch 40 pipe has an outside diameter of 1.9 inches. My horizontal pipe can be figured out by taking half of the pipe width (1.9) which is .95 and adding it to both sides. You end up adding 1.9, the outside diameter of the pipe, to the horizontal.
In order to determine what that horizontal needs to be for 72-inch center dimensions, you’ll reorient the formula again to solve for X. Take your desired center to center dimension (72) and subtract the outside diameter of the vertical pipe.
72 - 1.9 = 70.1
And again, I’d round down to the nearest ¼ of an inch, so my final answer would be 70 inches for my horizontal pipe.
I hope by breaking down these formulas and showing real examples of how we on the projects team determine how long pipes need to be was helpful for you. The good news is if you are still unsure we are available to do all the math for you! Feel free to reach out for design assistance.
