Building your railing isn’t as difficult as some think. Pipe and fittings are an intuitive system to use when building railing.
In this guide, you will learn how to build a metal pipe railing with pipe and fittings.
There are experts available to help you design the railing you need and walk you through its installation. However, the joy of pipe and fittings is how easy it is to do on your own. If this is your first time designing your own railing, then this guide will walk you through the decisions you’ll need to make to get it right the first time.
Before You Design Your Pipe Railing
Designing your pipe railing is a simple process. However, you don’t want to start choosing whichever fittings look right without asking yourself a few questions first.
What codes do you need to comply with?
Understanding what codes you must comply with will impact the design of your guardrail. There are three main organizations that you will want to consider.
OSHA (Occupational Safety and Health Administration) focus is to create standards that allow for a healthy and safe work environment. If you have employees, then you need to review OSHA. We developed a guide for OSHA railing to help you know how it could apply to you.
The ADA (Americans with Disabilities Act) ensures that those with disabilities are given the same opportunity to work and shop as anyone else. If you are dealing with public access, then review our ADA railing guide to find out how to structure your railing requirements.
Local building code is the other standard you will need to consider. This will change from state to state (or province if you’re in Canada). A helpful tool is to review the International Building Code (IBC). Most local codes will adopt these standards. Do NOT use IBC in place of your local code as it has no governing authority.
It is possible that all three standards could apply to your project. Take the time to understand how this will affect your design, including strength requirements, available space between rails, and whether it's needed.
What metal should you choose for your railing?
The next decision that you need to make is the type of metal that you want to use. We have galvanized steel and aluminum available. Aluminum tends to last longer in corrosive environments, but steel tends to be cheaper.
So, if your railing is going to be in a corrosive environment or if you are matching the look of an existing aluminum railing, then we would recommend aluminum. If neither of those things applies to you, we would recommend choosing steel for the cost savings and the wider variety of fittings available.
What size pipe and fittings should you use?
Next is the size of the pipe and fittings that you want. The bigger the pipe, the stronger it will be. That also means heavier and more surface to grip, which could make it less useful as a handrail. Our advice is to use size 8 (1-1/2 inch) pipe for guardrails and size 7 (1-1/4 inch) for handrail and ADA railing.
Now that you’ve laid the groundwork, it’s time to design the railing you need.
If you need a simple handrail that’s less than 8 feet long, then I would suggest checking out our handrail kits to make your life simpler.
Let’s get into the design.
Designing Your Pipe Railing
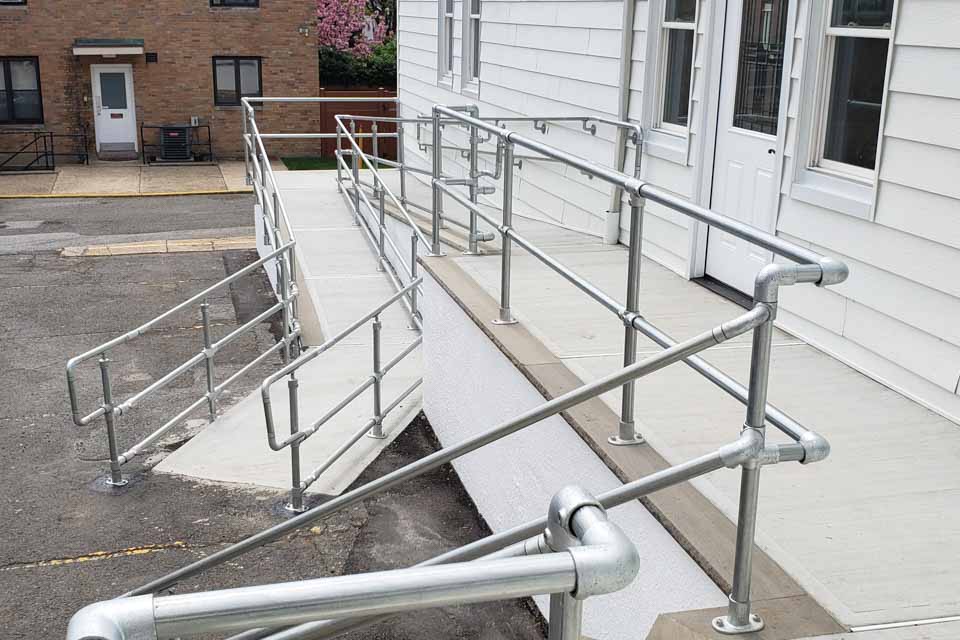
Step 1: Choose your mounting style
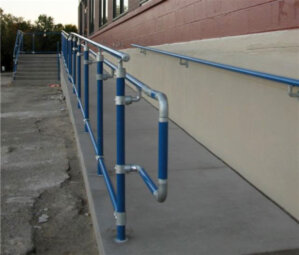
The first thing you want to do is determine how you will mount the post. You can mount it on a wall or to the top of a surface. You may want to mount to a wall if you don’t want to damage the walking surface, like with a rubber roof. Or, you may need to mount to a wall to preserve as much walking space on the surface as possible. If it doesn’t matter which you choose, I would mount it to the surface because it is easier to install.
Wall Mounting Railing Post
When you mount to the wall, you want to make sure that the post will clear any obstructions. Often a parapet or stair will have a section of tread that extends over the edge an inch or two. If this is the case for you, then you want to make sure that you use a fitting that offsets the post from the wall enough to clear the extension.
Surface Mounting Railing Post
When mounting to the top of the surface, you want to consider the slope of the surface you are mounting to. If you want the post to be plumb, then you want to choose the fitting that matches the angle. Your slope requirements may change from post to post, so make sure to count out how many posts are needed for each angle.


Step 2: Choose Your Post Style
Now it’s time to choose what fittings you need for the horizontal rails. This will be broken down into the 3 different styles of posts (end, corner, and intermediate), starting with the end posts.
Developing your posts will depend on the angle that the horizontal rail meets the post. Most of the time, this will be flat. However, if you have a stair or ramp, then this can vary, and you should check the angle to make sure. I’ll show you how to do two different posts for each style of post.
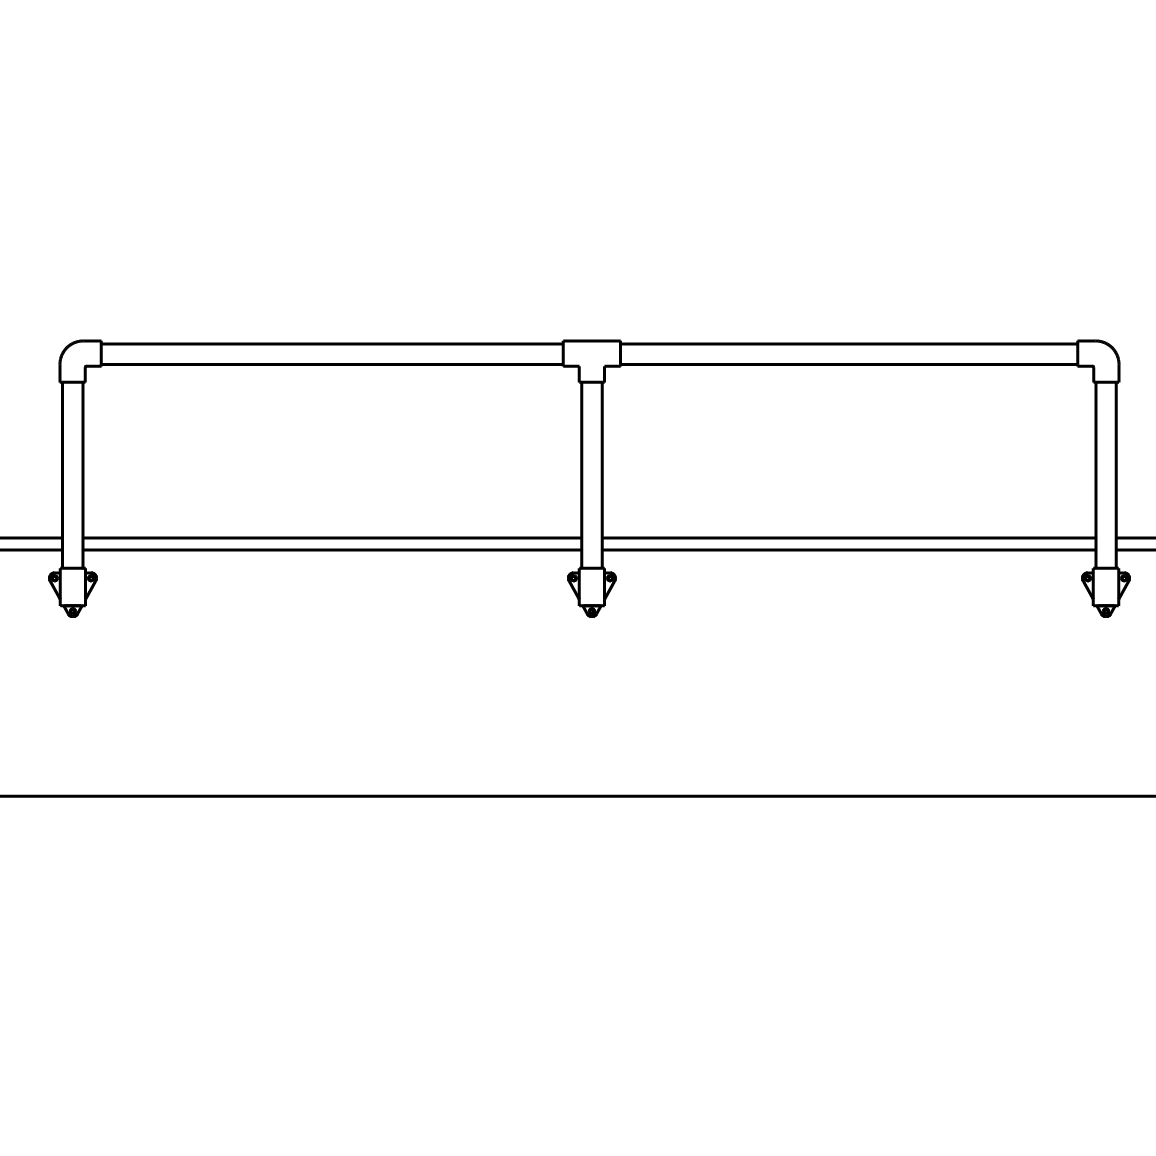
Standard Post Styles

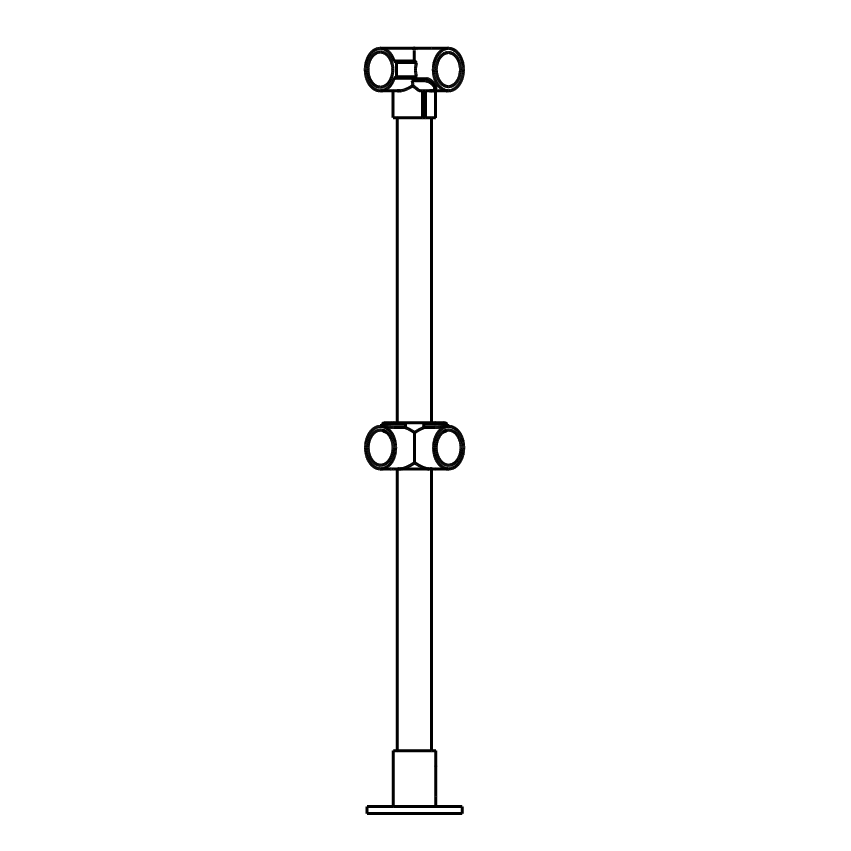
Specs:
- Height: 42"
- Pipe Size: 1.5"
Assembly:
- This is the most common post to use at the beginning and end of your rail.
What's included:
What's not:
Whether you’re a contractor without time to fabricate your own railing or an owner that wants to tackle the railing installation on your own, a pipe and fittings railing is the right fit for you.
There are experts available to help you design the railing you need and walk you through its installation. However, the joy of pipe and fittings is how easy it is to do on your own. If this is your first time designing your own railing, then this guide will walk you through the decisions you’ll need to make to get it right the first time.
The Value of Pipe and Fittings
Simple
Pipe railing is easy to design and install. No special permits or permissions are required to install a pipe railing made with fittings. No welding is required.
Durable
Fittings are available fully galvanized or aluminum. Studies have shown that pipe railing built with fittings lasts up to seven times longer than fabricated pipe railing.
Versatile
Pipe can be cut to fit on site and Our wide variety of fittings can be used to design pipe railing for any scenario.
Control
Using pipe and fittings allows you to control both the time it takes to design and the design itself. You don’t have to rely on others to finish the job you needed done yesterday.
The Various Types of Railings to Design


The First Metal Railing Design Choices to Make
What type of metal should you use?
There are several choices that need to be made to help guide which fittings and pipe you use for your railing. The first choice is the type of metal that you will use. Here at Simplified Building, you can choose between galvanized steel and anodized aluminum railing.
However, here is a bird’s eye view:
- Galvanized steel is stronger than aluminum. Aluminum is still a safe metal to use, however, you can get away with longer post spans with steel because of this strength.
- Aluminum is lighter than steel. This makes it easier to handle during installation or if you need to remove it for any reason.
- Corrosion is going to depend on your environment. More often, aluminum is going to be more corrosive resistant. However, we’ve worked with customers where galvanized steel was the better option. So, check with your local conditions before making this choice.
What size pipe should you use?
The size of the pipe that you use will depend on your application. We suggest that you use a 1-1/4” (size 7) pipe for handrails. It provides a better gripping surface for support rails.
If you are building a guardrail, then we suggest a 1-1/2” (size 8) pipe. The extra strength and rigidity are better suited for impact and allow for more grace with post spacing.
Something else to consider while choosing the size of your pipe is the type of fittings that are available in that size. Most standard fittings are available in both sizes. If you run into a unique application, then you may need to choose one or the other based on what fittings best solve your problem.
Designing Your Metal Railing Posts
Most railings will have different posts throughout the system. Different posts will be needed for the ends and throughout the system. The posts through the system may also need to be different depending on slope changes, direction changes, or any other obstacle the environment requires you to work around.
Here is what you need to know when you’re designing the various posts in your metal railing.
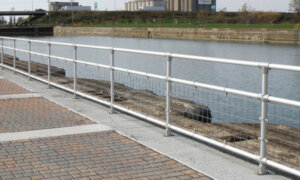
Number of Rails Needed
When picking the fittings that you want to use, the first thing that you need to consider is how many rails you need. OSHA guardrail typically has 2 rails unless you have a parapet or wall that is 21” or taller. In that case, you’ll only need one.
The fittings that you use for the top rail will be different than the fittings for the mid rail. Fittings for the top rail act as the cap for the post to help close it off from outside influences, like weather and insects.
The Posts Layout
Once you’ve determined the rail count, then you should determine where all your posts will be laid out. For the guardrail, we advise you to not exceed 8’ on center using size 8 pipe. For the handrail, we suggest using a 6’ on center post spacing. These are not hard and fast rules, but you should speak with an expert if you want to change from this.
When you have laid out your posts, this should give you a good idea of the types of posts that you need. Most often, guardrails end up on flat walking and working surfaces (1/12 slope or less). These are straightforward posts and use standard fittings for railing construction.
However, you may need to turn a corner or change your slope for a ramp or stair. In this case, you will want to make sure that the fittings you choose allow you to have a plumb post with a sloped railing. The angle of the required slope will determine which fitting works best.
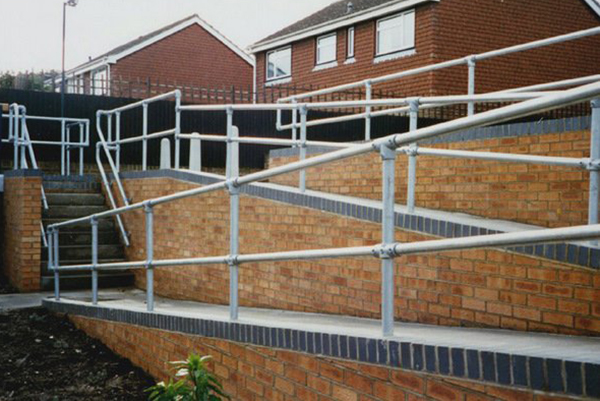
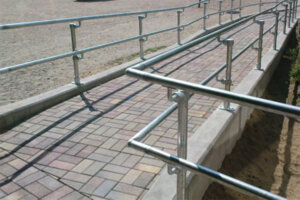
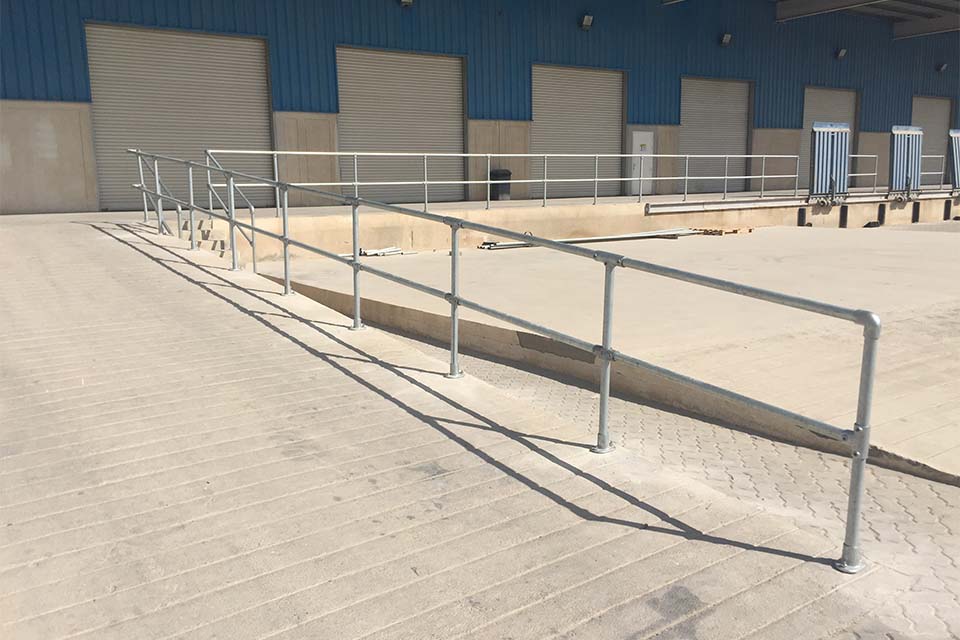
Corners, Handrails, and Ends
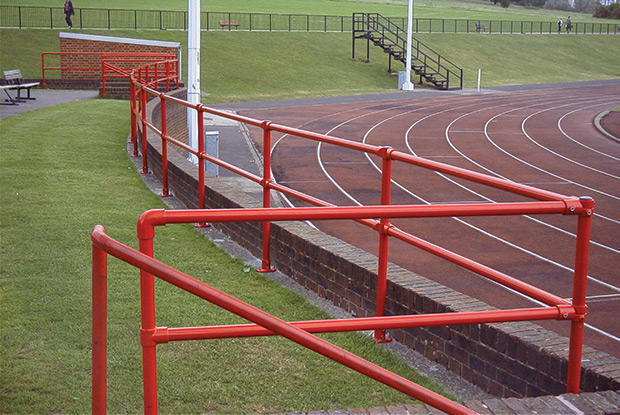
Corners can be addressed in multiple ways. You can have a post right on the corner or you can have the post offset from the corner and use elbow fittings to make the turn.
Handrails can be added to guardrails to provide appropriate support and ADA compliance. Here is a list of fittings that we use to work with ADA compliance.
You will also need to determine how you'd like to terminate your railing. You can end the railing at a final post or extend past that post and wrap it back on itself like a D. Or, you can have the railing mount into an existing structure, like a wall or an existing railing.
Mounting the Railing
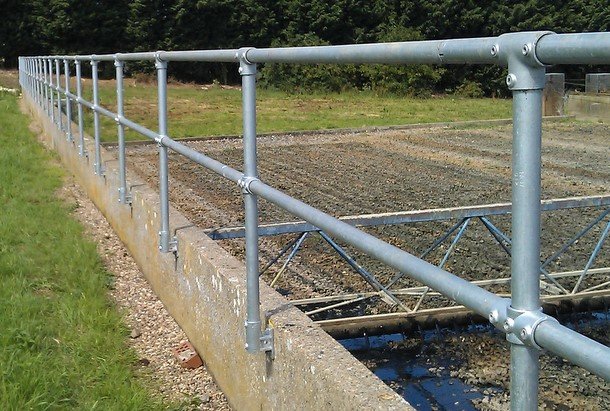
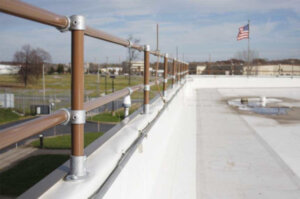
The last thing you need to think about is how you will mount the railing. The most common application is mounting to the walking surface. The flange that you use for this will change depending on the slope of the surface and whether you need toeboard.
Toeboard is needed to prevent tools or debris from rolling off the edge onto persons below or dangerous equipment.
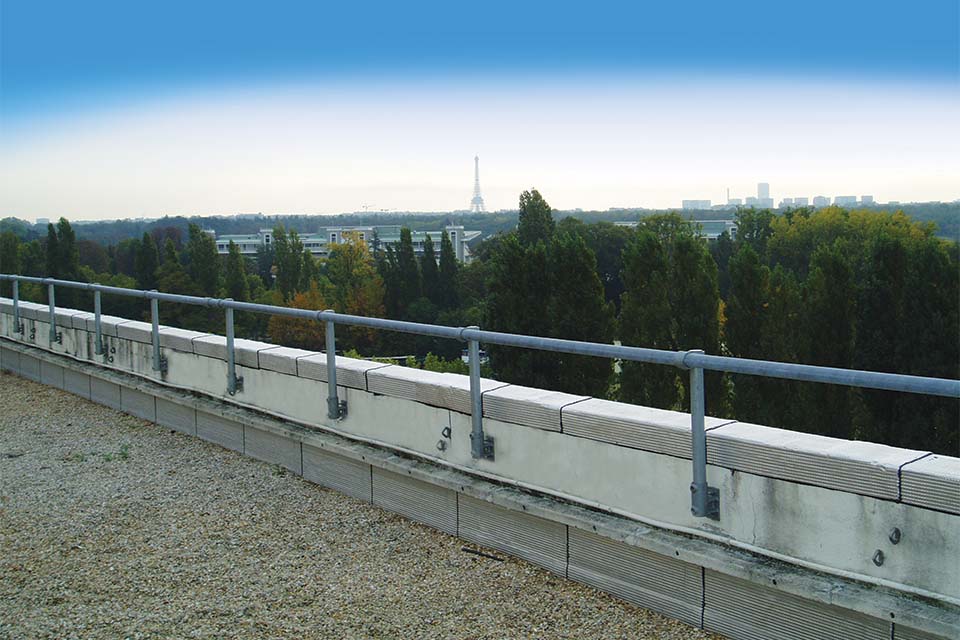
Other times, you will want to mount to the wall adjacent to the surface. If the mounting connection is below the walking surface, then we advise that you use two flanges per post. Don’t forget to check if the post needs to clear the lip of the surface, like with stone capping on a parapet wall.
Examples of Post Assemblies
Other Applications to Consider
Powder Coating
Pipe railing can be coated with a durable finish. This baked on finish improves the aesthetics of the railing and makes the pipe railing even more corrosion resistant. Both the pipe and the fittings can be powder coated
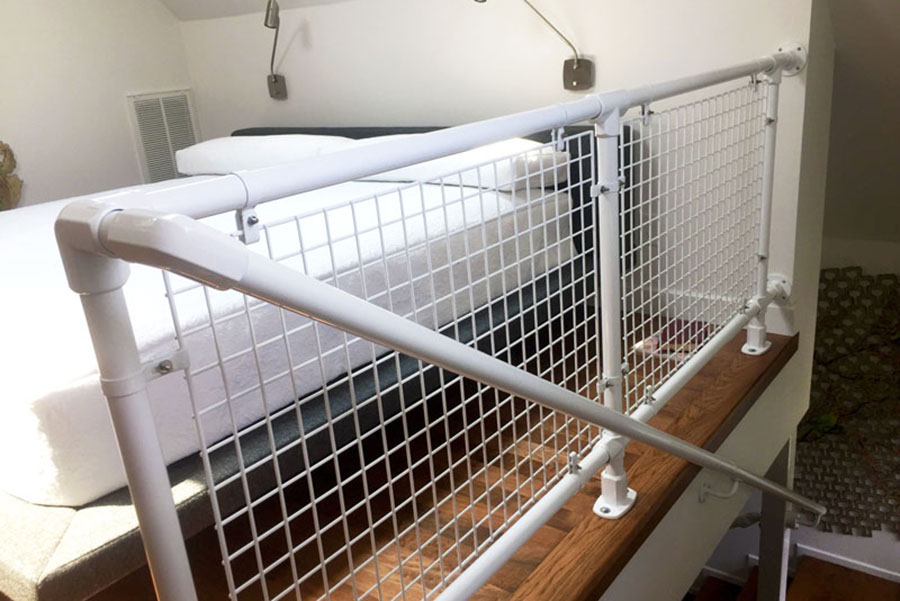
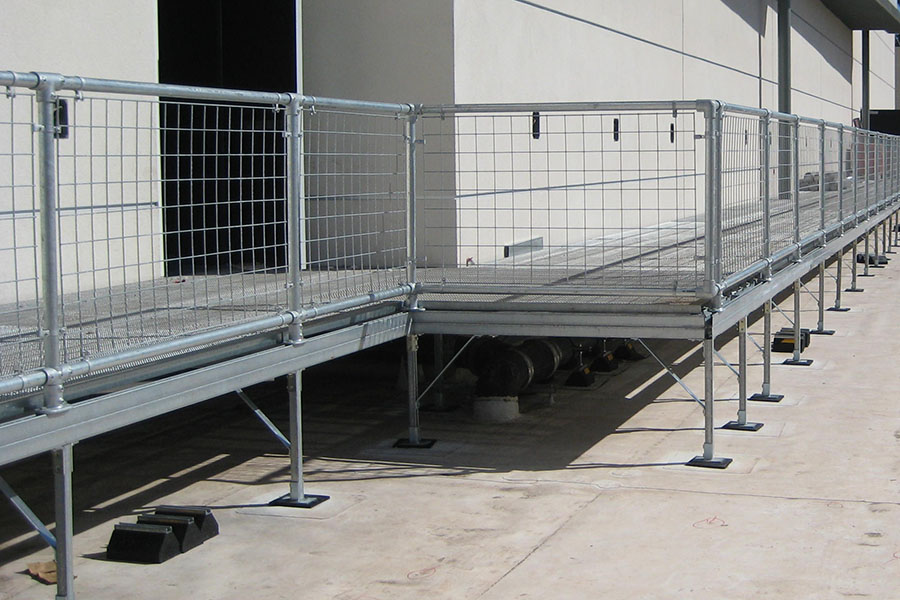
Infill Panels
Some local codes require that you include infill panels when certain people are accessing the area. This can be a vertical picket, a 4” x 4” wire grid, or other custom design.
Let Us Help You Build Your Railing

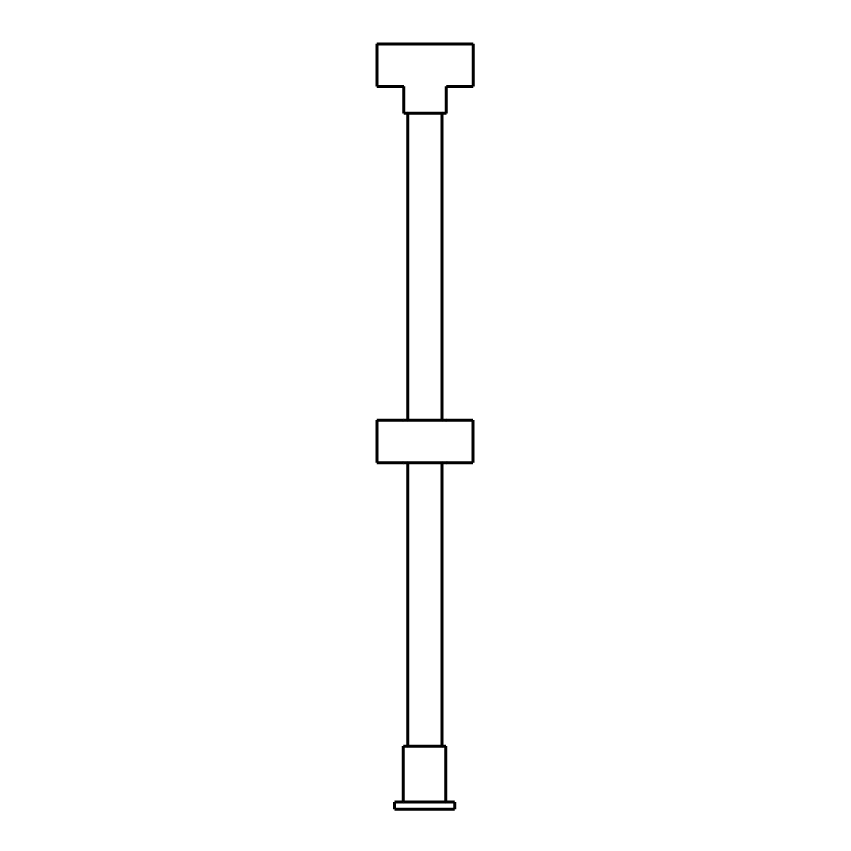
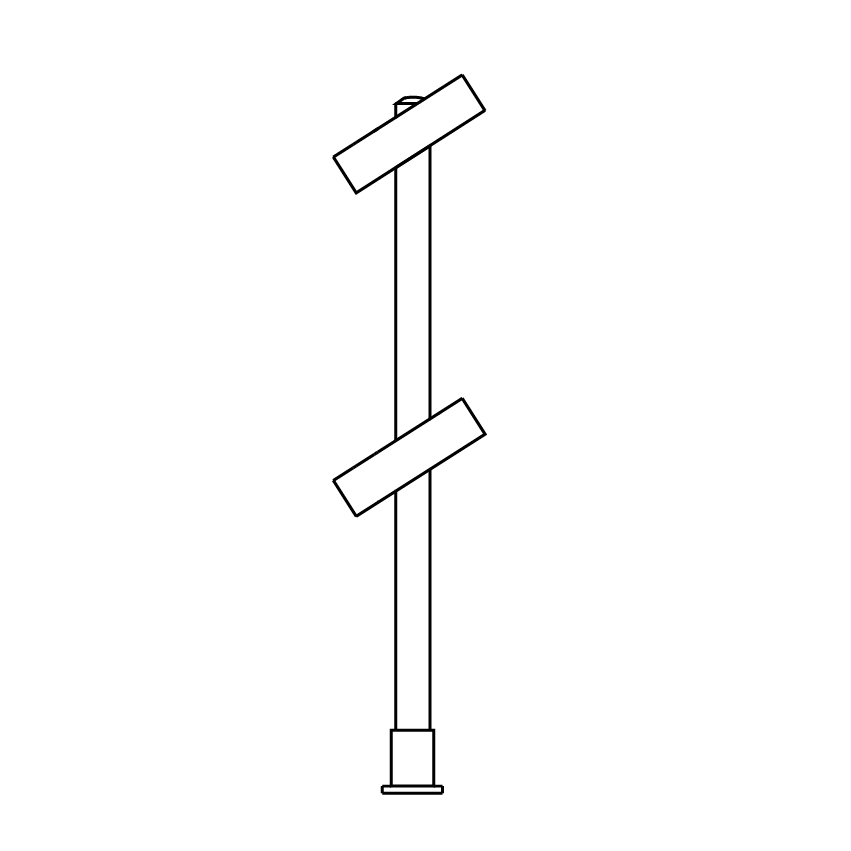
Specs:
- Height: 42"
- Pipe Size: 1.5"
Assembly:
- This is the most common post to use in the middle of your railing.
What's included:
What's not:
Whether you’re a contractor without time to fabricate your own railing or an owner that wants to tackle the railing installation on your own, a pipe and fittings railing is the right fit for you.
There are experts available to help you design the railing you need and walk you through its installation. However, the joy of pipe and fittings is how easy it is to do on your own. If this is your first time designing your own railing, then this guide will walk you through the decisions you’ll need to make to get it right the first time.
The Value of Pipe and Fittings
Simple
Pipe railing is easy to design and install. No special permits or permissions are required to install a pipe railing made with fittings. No welding is required.
Durable
Fittings are available fully galvanized or aluminum. Studies have shown that pipe railing built with fittings lasts up to seven times longer than fabricated pipe railing.
Versatile
Pipe can be cut to fit on site and Our wide variety of fittings can be used to design pipe railing for any scenario.
Control
Using pipe and fittings allows you to control both the time it takes to design and the design itself. You don’t have to rely on others to finish the job you needed done yesterday.
The Various Types of Railings to Design
The First Metal Railing Design Choices to Make
What type of metal should you use?
There are several choices that need to be made to help guide which fittings and pipe you use for your railing. The first choice is the type of metal that you will use. Here at Simplified Building, you can choose between galvanized steel and anodized aluminum railing.
However, here is a bird’s eye view:
- Galvanized steel is stronger than aluminum. Aluminum is still a safe metal to use, however, you can get away with longer post spans with steel because of this strength.
- Aluminum is lighter than steel. This makes it easier to handle during installation or if you need to remove it for any reason.
- Corrosion is going to depend on your environment. More often, aluminum is going to be more corrosive resistant. However, we’ve worked with customers where galvanized steel was the better option. So, check with your local conditions before making this choice.
What size pipe should you use?
The size of the pipe that you use will depend on your application. We suggest that you use a 1-1/4” (size 7) pipe for handrails. It provides a better gripping surface for support rails.
If you are building a guardrail, then we suggest a 1-1/2” (size 8) pipe. The extra strength and rigidity are better suited for impact and allow for more grace with post spacing.
Something else to consider while choosing the size of your pipe is the type of fittings that are available in that size. Most standard fittings are available in both sizes. If you run into a unique application, then you may need to choose one or the other based on what fittings best solve your problem.
Designing Your Metal Railing Posts
Most railings will have different posts throughout the system. Different posts will be needed for the ends and throughout the system. The posts through the system may also need to be different depending on slope changes, direction changes, or any other obstacle the environment requires you to work around.
Here is what you need to know when you’re designing the various posts in your metal railing.
Number of Rails Needed
When picking the fittings that you want to use, the first thing that you need to consider is how many rails you need. OSHA guardrail typically has 2 rails unless you have a parapet or wall that is 21” or taller. In that case, you’ll only need one.
The fittings that you use for the top rail will be different than the fittings for the mid rail. Fittings for the top rail act as the cap for the post to help close it off from outside influences, like weather and insects.
The Posts Layout
Once you’ve determined the rail count, then you should determine where all your posts will be laid out. For the guardrail, we advise you to not exceed 8’ on center using size 8 pipe. For the handrail, we suggest using a 6’ on center post spacing. These are not hard and fast rules, but you should speak with an expert if you want to change from this.
When you have laid out your posts, this should give you a good idea of the types of posts that you need. Most often, guardrails end up on flat walking and working surfaces (1/12 slope or less). These are straightforward posts and use standard fittings for railing construction.
However, you may need to turn a corner or change your slope for a ramp or stair. In this case, you will want to make sure that the fittings you choose allow you to have a plumb post with a sloped railing. The angle of the required slope will determine which fitting works best.
Corners, Handrails, and Ends
Corners can be addressed in multiple ways. You can have a post right on the corner or you can have the post offset from the corner and use elbow fittings to make the turn.
Handrails can be added to guardrails to provide appropriate support and ADA compliance. Here is a list of fittings that we use to work with ADA compliance.
You will also need to determine how you'd like to terminate your railing. You can end the railing at a final post or extend past that post and wrap it back on itself like a D. Or, you can have the railing mount into an existing structure, like a wall or an existing railing.
Mounting the Railing
The last thing you need to think about is how you will mount the railing. The most common application is mounting to the walking surface. The flange that you use for this will change depending on the slope of the surface and whether you need toeboard.
Toeboard is needed to prevent tools or debris from rolling off the edge onto persons below or dangerous equipment.
Other times, you will want to mount to the wall adjacent to the surface. If the mounting connection is below the walking surface, then we advise that you use two flanges per post. Don’t forget to check if the post needs to clear the lip of the surface, like with stone capping on a parapet wall.
Examples of Post Assemblies
Other Applications to Consider
Powder Coating
Pipe railing can be coated with a durable finish. This baked on finish improves the aesthetics of the railing and makes the pipe railing even more corrosion resistant. Both the pipe and the fittings can be powder coated
Infill Panels
Some local codes require that you include infill panels when certain people are accessing the area. This can be a vertical picket, a 4” x 4” wire grid, or other custom design.
Let Us Help You Build Your Railing
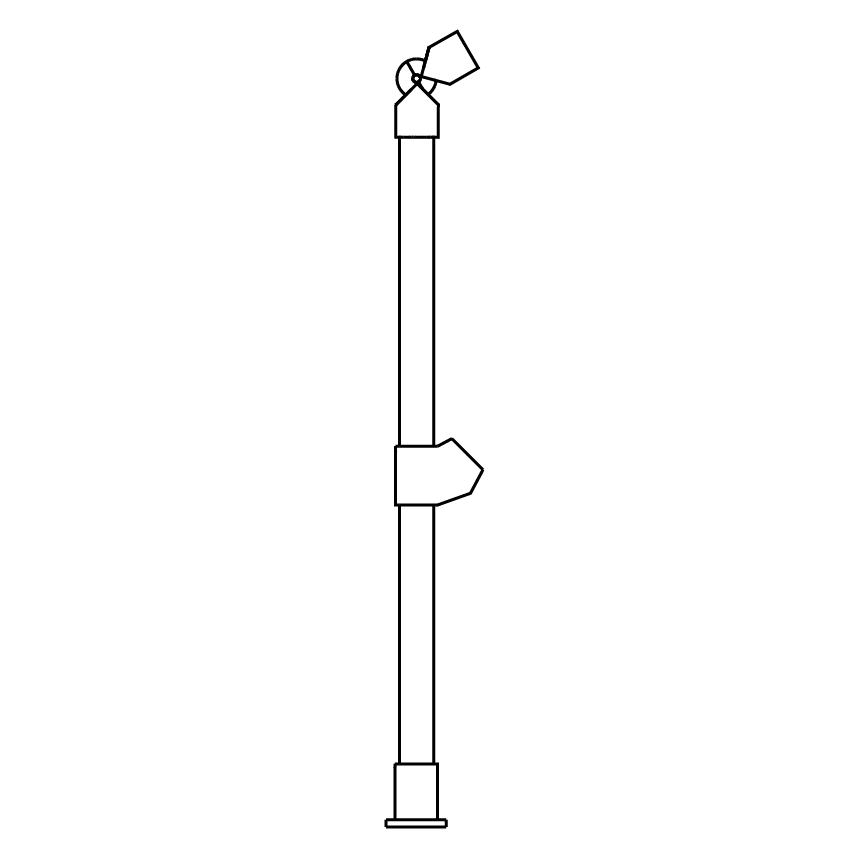
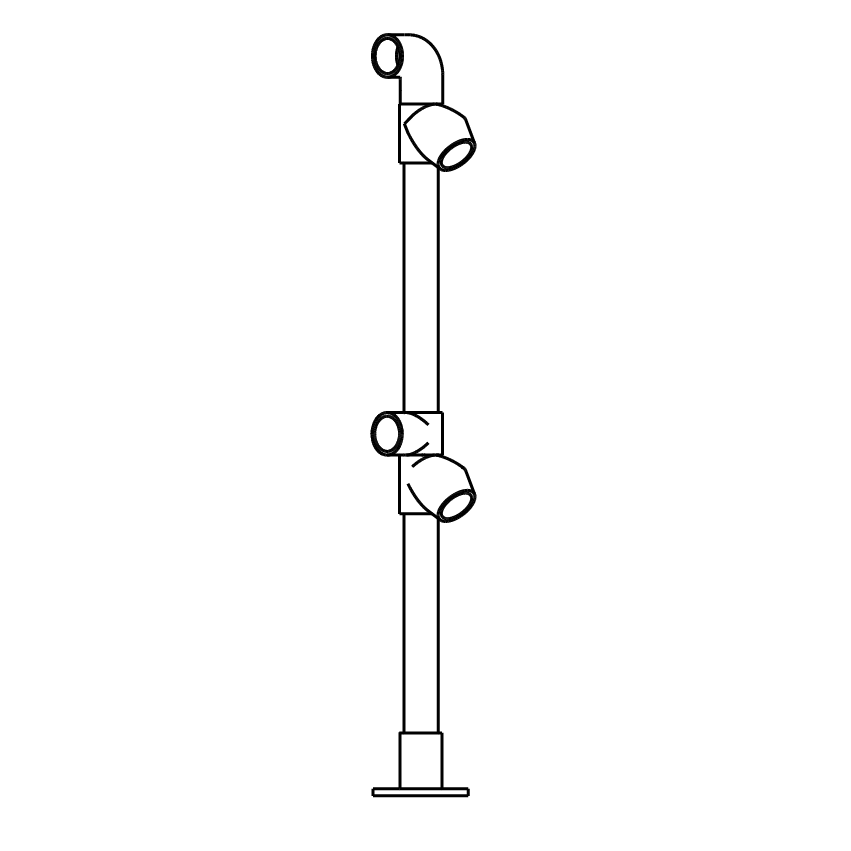
Specs:
- Height: 42".
- Pipe Size: 1.5".
Assembly:
- This post would be used to turn a 90-degree corner for a flat railing.
What's included:
What's not:
Whether you’re a contractor without time to fabricate your own railing or an owner that wants to tackle the railing installation on your own, a pipe and fittings railing is the right fit for you.
There are experts available to help you design the railing you need and walk you through its installation. However, the joy of pipe and fittings is how easy it is to do on your own. If this is your first time designing your own railing, then this guide will walk you through the decisions you’ll need to make to get it right the first time.
The Value of Pipe and Fittings
Simple
Pipe railing is easy to design and install. No special permits or permissions are required to install a pipe railing made with fittings. No welding is required.
Durable
Fittings are available fully galvanized or aluminum. Studies have shown that pipe railing built with fittings lasts up to seven times longer than fabricated pipe railing.
Versatile
Pipe can be cut to fit on site and Our wide variety of fittings can be used to design pipe railing for any scenario.
Control
Using pipe and fittings allows you to control both the time it takes to design and the design itself. You don’t have to rely on others to finish the job you needed done yesterday.
The Various Types of Railings to Design
The First Metal Railing Design Choices to Make
What type of metal should you use?
There are several choices that need to be made to help guide which fittings and pipe you use for your railing. The first choice is the type of metal that you will use. Here at Simplified Building, you can choose between galvanized steel and anodized aluminum railing.
However, here is a bird’s eye view:
- Galvanized steel is stronger than aluminum. Aluminum is still a safe metal to use, however, you can get away with longer post spans with steel because of this strength.
- Aluminum is lighter than steel. This makes it easier to handle during installation or if you need to remove it for any reason.
- Corrosion is going to depend on your environment. More often, aluminum is going to be more corrosive resistant. However, we’ve worked with customers where galvanized steel was the better option. So, check with your local conditions before making this choice.
What size pipe should you use?
The size of the pipe that you use will depend on your application. We suggest that you use a 1-1/4” (size 7) pipe for handrails. It provides a better gripping surface for support rails.
If you are building a guardrail, then we suggest a 1-1/2” (size 8) pipe. The extra strength and rigidity are better suited for impact and allow for more grace with post spacing.
Something else to consider while choosing the size of your pipe is the type of fittings that are available in that size. Most standard fittings are available in both sizes. If you run into a unique application, then you may need to choose one or the other based on what fittings best solve your problem.
Designing Your Metal Railing Posts
Most railings will have different posts throughout the system. Different posts will be needed for the ends and throughout the system. The posts through the system may also need to be different depending on slope changes, direction changes, or any other obstacle the environment requires you to work around.
Here is what you need to know when you’re designing the various posts in your metal railing.
Number of Rails Needed
When picking the fittings that you want to use, the first thing that you need to consider is how many rails you need. OSHA guardrail typically has 2 rails unless you have a parapet or wall that is 21” or taller. In that case, you’ll only need one.
The fittings that you use for the top rail will be different than the fittings for the mid rail. Fittings for the top rail act as the cap for the post to help close it off from outside influences, like weather and insects.
The Posts Layout
Once you’ve determined the rail count, then you should determine where all your posts will be laid out. For the guardrail, we advise you to not exceed 8’ on center using size 8 pipe. For the handrail, we suggest using a 6’ on center post spacing. These are not hard and fast rules, but you should speak with an expert if you want to change from this.
When you have laid out your posts, this should give you a good idea of the types of posts that you need. Most often, guardrails end up on flat walking and working surfaces (1/12 slope or less). These are straightforward posts and use standard fittings for railing construction.
However, you may need to turn a corner or change your slope for a ramp or stair. In this case, you will want to make sure that the fittings you choose allow you to have a plumb post with a sloped railing. The angle of the required slope will determine which fitting works best.
Corners, Handrails, and Ends
Corners can be addressed in multiple ways. You can have a post right on the corner or you can have the post offset from the corner and use elbow fittings to make the turn.
Handrails can be added to guardrails to provide appropriate support and ADA compliance. Here is a list of fittings that we use to work with ADA compliance.
You will also need to determine how you'd like to terminate your railing. You can end the railing at a final post or extend past that post and wrap it back on itself like a D. Or, you can have the railing mount into an existing structure, like a wall or an existing railing.
Mounting the Railing
The last thing you need to think about is how you will mount the railing. The most common application is mounting to the walking surface. The flange that you use for this will change depending on the slope of the surface and whether you need toeboard.
Toeboard is needed to prevent tools or debris from rolling off the edge onto persons below or dangerous equipment.
Other times, you will want to mount to the wall adjacent to the surface. If the mounting connection is below the walking surface, then we advise that you use two flanges per post. Don’t forget to check if the post needs to clear the lip of the surface, like with stone capping on a parapet wall.
Examples of Post Assemblies
Other Applications to Consider
Powder Coating
Pipe railing can be coated with a durable finish. This baked on finish improves the aesthetics of the railing and makes the pipe railing even more corrosion resistant. Both the pipe and the fittings can be powder coated
Infill Panels
Some local codes require that you include infill panels when certain people are accessing the area. This can be a vertical picket, a 4” x 4” wire grid, or other custom design.
Let Us Help You Build Your Railing
Angled Post Styles
Specs:
- Height: 36"
- Pipe Size: 1.5"
Assembly:
- This is a common and adjustable post that you would use at the bottom of a stair or ramp.
What's included:
What's not:
Whether you’re a contractor without time to fabricate your own railing or an owner that wants to tackle the railing installation on your own, a pipe and fittings railing is the right fit for you.
There are experts available to help you design the railing you need and walk you through its installation. However, the joy of pipe and fittings is how easy it is to do on your own. If this is your first time designing your own railing, then this guide will walk you through the decisions you’ll need to make to get it right the first time.
The Value of Pipe and Fittings
Simple
Pipe railing is easy to design and install. No special permits or permissions are required to install a pipe railing made with fittings. No welding is required.
Durable
Fittings are available fully galvanized or aluminum. Studies have shown that pipe railing built with fittings lasts up to seven times longer than fabricated pipe railing.
Versatile
Pipe can be cut to fit on site and Our wide variety of fittings can be used to design pipe railing for any scenario.
Control
Using pipe and fittings allows you to control both the time it takes to design and the design itself. You don’t have to rely on others to finish the job you needed done yesterday.
The Various Types of Railings to Design
The First Metal Railing Design Choices to Make
What type of metal should you use?
There are several choices that need to be made to help guide which fittings and pipe you use for your railing. The first choice is the type of metal that you will use. Here at Simplified Building, you can choose between galvanized steel and anodized aluminum railing.
However, here is a bird’s eye view:
- Galvanized steel is stronger than aluminum. Aluminum is still a safe metal to use, however, you can get away with longer post spans with steel because of this strength.
- Aluminum is lighter than steel. This makes it easier to handle during installation or if you need to remove it for any reason.
- Corrosion is going to depend on your environment. More often, aluminum is going to be more corrosive resistant. However, we’ve worked with customers where galvanized steel was the better option. So, check with your local conditions before making this choice.
What size pipe should you use?
The size of the pipe that you use will depend on your application. We suggest that you use a 1-1/4” (size 7) pipe for handrails. It provides a better gripping surface for support rails.
If you are building a guardrail, then we suggest a 1-1/2” (size 8) pipe. The extra strength and rigidity are better suited for impact and allow for more grace with post spacing.
Something else to consider while choosing the size of your pipe is the type of fittings that are available in that size. Most standard fittings are available in both sizes. If you run into a unique application, then you may need to choose one or the other based on what fittings best solve your problem.
Designing Your Metal Railing Posts
Most railings will have different posts throughout the system. Different posts will be needed for the ends and throughout the system. The posts through the system may also need to be different depending on slope changes, direction changes, or any other obstacle the environment requires you to work around.
Here is what you need to know when you’re designing the various posts in your metal railing.
Number of Rails Needed
When picking the fittings that you want to use, the first thing that you need to consider is how many rails you need. OSHA guardrail typically has 2 rails unless you have a parapet or wall that is 21” or taller. In that case, you’ll only need one.
The fittings that you use for the top rail will be different than the fittings for the mid rail. Fittings for the top rail act as the cap for the post to help close it off from outside influences, like weather and insects.
The Posts Layout
Once you’ve determined the rail count, then you should determine where all your posts will be laid out. For the guardrail, we advise you to not exceed 8’ on center using size 8 pipe. For the handrail, we suggest using a 6’ on center post spacing. These are not hard and fast rules, but you should speak with an expert if you want to change from this.
When you have laid out your posts, this should give you a good idea of the types of posts that you need. Most often, guardrails end up on flat walking and working surfaces (1/12 slope or less). These are straightforward posts and use standard fittings for railing construction.
However, you may need to turn a corner or change your slope for a ramp or stair. In this case, you will want to make sure that the fittings you choose allow you to have a plumb post with a sloped railing. The angle of the required slope will determine which fitting works best.
Corners, Handrails, and Ends
Corners can be addressed in multiple ways. You can have a post right on the corner or you can have the post offset from the corner and use elbow fittings to make the turn.
Handrails can be added to guardrails to provide appropriate support and ADA compliance. Here is a list of fittings that we use to work with ADA compliance.
You will also need to determine how you'd like to terminate your railing. You can end the railing at a final post or extend past that post and wrap it back on itself like a D. Or, you can have the railing mount into an existing structure, like a wall or an existing railing.
Mounting the Railing
The last thing you need to think about is how you will mount the railing. The most common application is mounting to the walking surface. The flange that you use for this will change depending on the slope of the surface and whether you need toeboard.
Toeboard is needed to prevent tools or debris from rolling off the edge onto persons below or dangerous equipment.
Other times, you will want to mount to the wall adjacent to the surface. If the mounting connection is below the walking surface, then we advise that you use two flanges per post. Don’t forget to check if the post needs to clear the lip of the surface, like with stone capping on a parapet wall.
Examples of Post Assemblies
Other Applications to Consider
Powder Coating
Pipe railing can be coated with a durable finish. This baked on finish improves the aesthetics of the railing and makes the pipe railing even more corrosion resistant. Both the pipe and the fittings can be powder coated
Infill Panels
Some local codes require that you include infill panels when certain people are accessing the area. This can be a vertical picket, a 4” x 4” wire grid, or other custom design.
Let Us Help You Build Your Railing
Specs:
- Height: 36"
- Pipe Size: 1.5"
Assembly:
- This is a common post that you would use in the middle of a stair railing.
What's included:
Whether you’re a contractor without time to fabricate your own railing or an owner that wants to tackle the railing installation on your own, a pipe and fittings railing is the right fit for you.
There are experts available to help you design the railing you need and walk you through its installation. However, the joy of pipe and fittings is how easy it is to do on your own. If this is your first time designing your own railing, then this guide will walk you through the decisions you’ll need to make to get it right the first time.
The Value of Pipe and Fittings
Simple
Pipe railing is easy to design and install. No special permits or permissions are required to install a pipe railing made with fittings. No welding is required.
Durable
Fittings are available fully galvanized or aluminum. Studies have shown that pipe railing built with fittings lasts up to seven times longer than fabricated pipe railing.
Versatile
Pipe can be cut to fit on site and Our wide variety of fittings can be used to design pipe railing for any scenario.
Control
Using pipe and fittings allows you to control both the time it takes to design and the design itself. You don’t have to rely on others to finish the job you needed done yesterday.
The Various Types of Railings to Design
The First Metal Railing Design Choices to Make
What type of metal should you use?
There are several choices that need to be made to help guide which fittings and pipe you use for your railing. The first choice is the type of metal that you will use. Here at Simplified Building, you can choose between galvanized steel and anodized aluminum railing.
However, here is a bird’s eye view:
- Galvanized steel is stronger than aluminum. Aluminum is still a safe metal to use, however, you can get away with longer post spans with steel because of this strength.
- Aluminum is lighter than steel. This makes it easier to handle during installation or if you need to remove it for any reason.
- Corrosion is going to depend on your environment. More often, aluminum is going to be more corrosive resistant. However, we’ve worked with customers where galvanized steel was the better option. So, check with your local conditions before making this choice.
What size pipe should you use?
The size of the pipe that you use will depend on your application. We suggest that you use a 1-1/4” (size 7) pipe for handrails. It provides a better gripping surface for support rails.
If you are building a guardrail, then we suggest a 1-1/2” (size 8) pipe. The extra strength and rigidity are better suited for impact and allow for more grace with post spacing.
Something else to consider while choosing the size of your pipe is the type of fittings that are available in that size. Most standard fittings are available in both sizes. If you run into a unique application, then you may need to choose one or the other based on what fittings best solve your problem.
Designing Your Metal Railing Posts
Most railings will have different posts throughout the system. Different posts will be needed for the ends and throughout the system. The posts through the system may also need to be different depending on slope changes, direction changes, or any other obstacle the environment requires you to work around.
Here is what you need to know when you’re designing the various posts in your metal railing.
Number of Rails Needed
When picking the fittings that you want to use, the first thing that you need to consider is how many rails you need. OSHA guardrail typically has 2 rails unless you have a parapet or wall that is 21” or taller. In that case, you’ll only need one.
The fittings that you use for the top rail will be different than the fittings for the mid rail. Fittings for the top rail act as the cap for the post to help close it off from outside influences, like weather and insects.
The Posts Layout
Once you’ve determined the rail count, then you should determine where all your posts will be laid out. For the guardrail, we advise you to not exceed 8’ on center using size 8 pipe. For the handrail, we suggest using a 6’ on center post spacing. These are not hard and fast rules, but you should speak with an expert if you want to change from this.
When you have laid out your posts, this should give you a good idea of the types of posts that you need. Most often, guardrails end up on flat walking and working surfaces (1/12 slope or less). These are straightforward posts and use standard fittings for railing construction.
However, you may need to turn a corner or change your slope for a ramp or stair. In this case, you will want to make sure that the fittings you choose allow you to have a plumb post with a sloped railing. The angle of the required slope will determine which fitting works best.
Corners, Handrails, and Ends
Corners can be addressed in multiple ways. You can have a post right on the corner or you can have the post offset from the corner and use elbow fittings to make the turn.
Handrails can be added to guardrails to provide appropriate support and ADA compliance. Here is a list of fittings that we use to work with ADA compliance.
You will also need to determine how you'd like to terminate your railing. You can end the railing at a final post or extend past that post and wrap it back on itself like a D. Or, you can have the railing mount into an existing structure, like a wall or an existing railing.
Mounting the Railing
The last thing you need to think about is how you will mount the railing. The most common application is mounting to the walking surface. The flange that you use for this will change depending on the slope of the surface and whether you need toeboard.
Toeboard is needed to prevent tools or debris from rolling off the edge onto persons below or dangerous equipment.
Other times, you will want to mount to the wall adjacent to the surface. If the mounting connection is below the walking surface, then we advise that you use two flanges per post. Don’t forget to check if the post needs to clear the lip of the surface, like with stone capping on a parapet wall.
Examples of Post Assemblies
Other Applications to Consider
Powder Coating
Pipe railing can be coated with a durable finish. This baked on finish improves the aesthetics of the railing and makes the pipe railing even more corrosion resistant. Both the pipe and the fittings can be powder coated
Infill Panels
Some local codes require that you include infill panels when certain people are accessing the area. This can be a vertical picket, a 4” x 4” wire grid, or other custom design.
Let Us Help You Build Your Railing
Specs:
- Height: 42".
- Pipe Size: 1.5".
Assembly:
- This post would be used when you have a standard dock railing that turns into a stair railing.
What's included:
Whether you’re a contractor without time to fabricate your own railing or an owner that wants to tackle the railing installation on your own, a pipe and fittings railing is the right fit for you.
There are experts available to help you design the railing you need and walk you through its installation. However, the joy of pipe and fittings is how easy it is to do on your own. If this is your first time designing your own railing, then this guide will walk you through the decisions you’ll need to make to get it right the first time.
The Value of Pipe and Fittings
Simple
Pipe railing is easy to design and install. No special permits or permissions are required to install a pipe railing made with fittings. No welding is required.
Durable
Fittings are available fully galvanized or aluminum. Studies have shown that pipe railing built with fittings lasts up to seven times longer than fabricated pipe railing.
Versatile
Pipe can be cut to fit on site and Our wide variety of fittings can be used to design pipe railing for any scenario.
Control
Using pipe and fittings allows you to control both the time it takes to design and the design itself. You don’t have to rely on others to finish the job you needed done yesterday.
The Various Types of Railings to Design
The First Metal Railing Design Choices to Make
What type of metal should you use?
There are several choices that need to be made to help guide which fittings and pipe you use for your railing. The first choice is the type of metal that you will use. Here at Simplified Building, you can choose between galvanized steel and anodized aluminum railing.
However, here is a bird’s eye view:
- Galvanized steel is stronger than aluminum. Aluminum is still a safe metal to use, however, you can get away with longer post spans with steel because of this strength.
- Aluminum is lighter than steel. This makes it easier to handle during installation or if you need to remove it for any reason.
- Corrosion is going to depend on your environment. More often, aluminum is going to be more corrosive resistant. However, we’ve worked with customers where galvanized steel was the better option. So, check with your local conditions before making this choice.
What size pipe should you use?
The size of the pipe that you use will depend on your application. We suggest that you use a 1-1/4” (size 7) pipe for handrails. It provides a better gripping surface for support rails.
If you are building a guardrail, then we suggest a 1-1/2” (size 8) pipe. The extra strength and rigidity are better suited for impact and allow for more grace with post spacing.
Something else to consider while choosing the size of your pipe is the type of fittings that are available in that size. Most standard fittings are available in both sizes. If you run into a unique application, then you may need to choose one or the other based on what fittings best solve your problem.
Designing Your Metal Railing Posts
Most railings will have different posts throughout the system. Different posts will be needed for the ends and throughout the system. The posts through the system may also need to be different depending on slope changes, direction changes, or any other obstacle the environment requires you to work around.
Here is what you need to know when you’re designing the various posts in your metal railing.
Number of Rails Needed
When picking the fittings that you want to use, the first thing that you need to consider is how many rails you need. OSHA guardrail typically has 2 rails unless you have a parapet or wall that is 21” or taller. In that case, you’ll only need one.
The fittings that you use for the top rail will be different than the fittings for the mid rail. Fittings for the top rail act as the cap for the post to help close it off from outside influences, like weather and insects.
The Posts Layout
Once you’ve determined the rail count, then you should determine where all your posts will be laid out. For the guardrail, we advise you to not exceed 8’ on center using size 8 pipe. For the handrail, we suggest using a 6’ on center post spacing. These are not hard and fast rules, but you should speak with an expert if you want to change from this.
When you have laid out your posts, this should give you a good idea of the types of posts that you need. Most often, guardrails end up on flat walking and working surfaces (1/12 slope or less). These are straightforward posts and use standard fittings for railing construction.
However, you may need to turn a corner or change your slope for a ramp or stair. In this case, you will want to make sure that the fittings you choose allow you to have a plumb post with a sloped railing. The angle of the required slope will determine which fitting works best.
Corners, Handrails, and Ends
Corners can be addressed in multiple ways. You can have a post right on the corner or you can have the post offset from the corner and use elbow fittings to make the turn.
Handrails can be added to guardrails to provide appropriate support and ADA compliance. Here is a list of fittings that we use to work with ADA compliance.
You will also need to determine how you'd like to terminate your railing. You can end the railing at a final post or extend past that post and wrap it back on itself like a D. Or, you can have the railing mount into an existing structure, like a wall or an existing railing.
Mounting the Railing
The last thing you need to think about is how you will mount the railing. The most common application is mounting to the walking surface. The flange that you use for this will change depending on the slope of the surface and whether you need toeboard.
Toeboard is needed to prevent tools or debris from rolling off the edge onto persons below or dangerous equipment.
Other times, you will want to mount to the wall adjacent to the surface. If the mounting connection is below the walking surface, then we advise that you use two flanges per post. Don’t forget to check if the post needs to clear the lip of the surface, like with stone capping on a parapet wall.
Examples of Post Assemblies
Other Applications to Consider
Powder Coating
Pipe railing can be coated with a durable finish. This baked on finish improves the aesthetics of the railing and makes the pipe railing even more corrosion resistant. Both the pipe and the fittings can be powder coated
Infill Panels
Some local codes require that you include infill panels when certain people are accessing the area. This can be a vertical picket, a 4” x 4” wire grid, or other custom design.
Let Us Help You Build Your Railing
Step 3: Determine your post spacing
To figure out how many of the above posts you need will require you to know your post spacing. Here are our recommendations for max post spacing.
- OSHA: 8 feet on center or less
- ADA or Residential Railing: 6 feet on center or less.
- IBC or Building Code: 4 feet on center or less. This is typical because the load requirements are stronger (50lbs of force per foot).
It’s like that your lengths won’t divide evenly by the above recommendations. In this case, make your post spacing even without exceeding the recommendations. For instance, if you need 21 feet of OSHA guardrail, I would divide that into 3 sections of 7 feet instead of 2 sections of 8 feet and one of 5 feet.
Step 4: Choosing your pipe lengths
The number of posts that you have and the distance between them will determine the length of the rails that you need. The lengths for both posts and horizontal rails can be different and there are a few ways to deal with this difference.
You can choose to have each piece of pipe cut to length. If you do this, then there are a few things for you to keep in mind.
- The length of pipe will not be the total height of the post or on-center distance between your posts. This is true because the fittings will add to that distance. I would take 2 inches off the length of the pipe to compensate for this.
- Exception: If you are using open fittings for the top rail, like the crossover fitting, then you will use the total length that the height should be.
- Heights of your posts may vary depending on where the post is being installed. For instance, your stair will want a 36” tall handrail. However, your dock will need a 42” tall handrail. So, you would need two separate posts.
- The lengths of your horizontal rails can be different from section to section depending on what you determined the posts spacing to be.
Another option is find the longest section that you need for posts and horizontal rails and use that for everything that you need. This will mean that you need to cut on site, but it gives you greater flexibility on site and reduces the margin for ordering the wrong length.
Other Things to Consider
Gaps and Corners
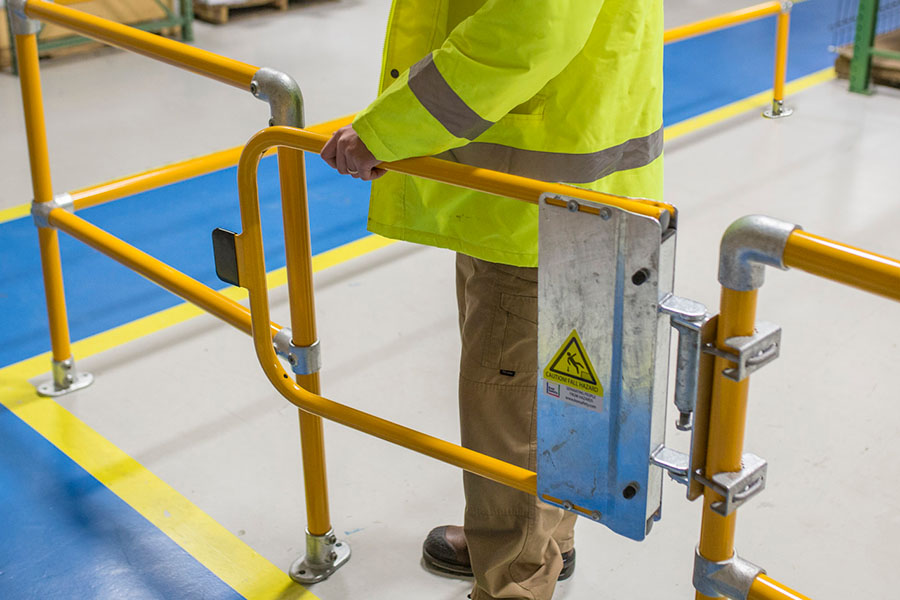
If you need a safety gate, then now would be the time to add the quantity you need to your project. This is also a good time for you to include corner fittings if your posts are not located on the corner. There are fittings to match a wide variety of angles. Here are a few examples.
Toeboard
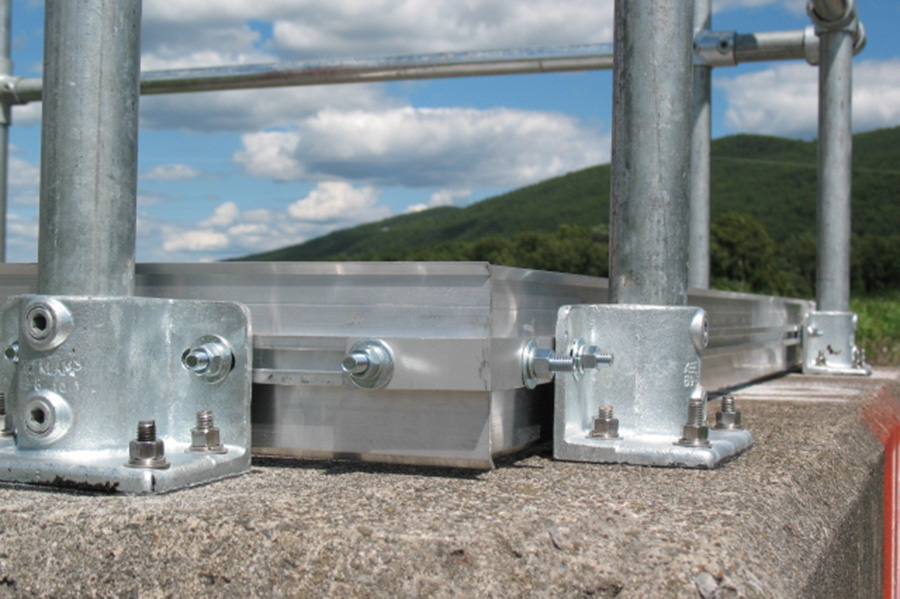
Toeboard may be required for your project if there is a concern for debris falling on people or dangerous machinery. If so, you will add the lengths you need, straight splices to connect the individual pieces, corner splices for, well, corners, and fixing packs equal to the number of posts you will be connecting to. If the toeboard ends in a wall, then you can add a corner splice to attach to the wall. Don’t forget to make sure that the flange on your system can support a toeboard. If it cannot, connect with one of our specialists, and we’ll help you solve that problem.
Additional Services We Offer
Powder Coating
Powder coating can be as simple as black, white, gray, or yellow. However, if you need to comply with a specific color palette, find the RAL color number for it and connect with one of our specialists. Powder coating is mostly an aesthetic choice as our fittings are either galvanized steel or aluminum.
Infill Panels
The last thing that you may need is infill panels. There are several ways to accommodate this need. You could use chain-link vinyl fencing. Or we can provide wire grid infill panels or picket infill panels. The cost will depend on the quantity and style that you want. Our team will help you navigate this. Contact us today.
Tips for Finalizing Your Railing
One of the things that I like to do is make a spreadsheet of the fittings I need. You can use excel for this, but don’t worry if you’re not proficient or want to take the time. A chart drawn on paper works just as well.
My rows will represent the various fittings in the project. My columns represent my posts and other constructs I built into the railing. Then, I count each fitting and tally in the right cells. This will allow me to get a total on each component I need to add to the cart without the fear of missing something.
Follow a similar process for how much pipe you need for your top, mid, and bottom rails, as needed. Don’t forget to include the pipe that you need for posts.
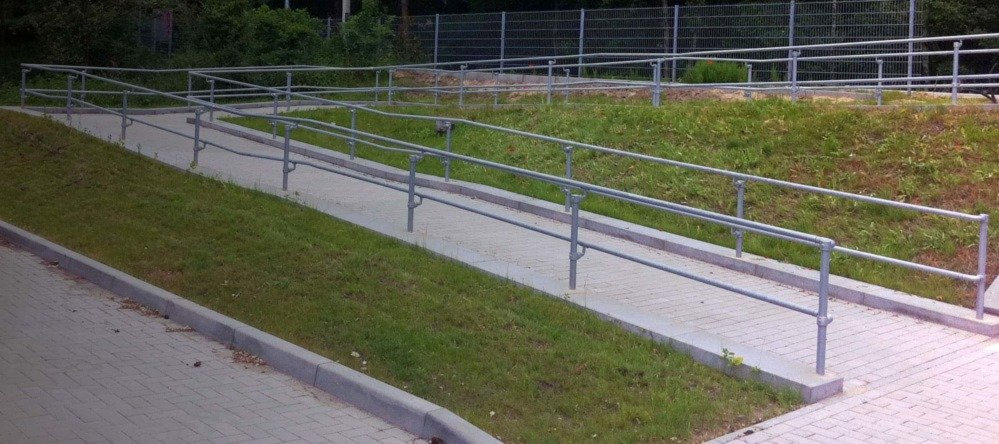
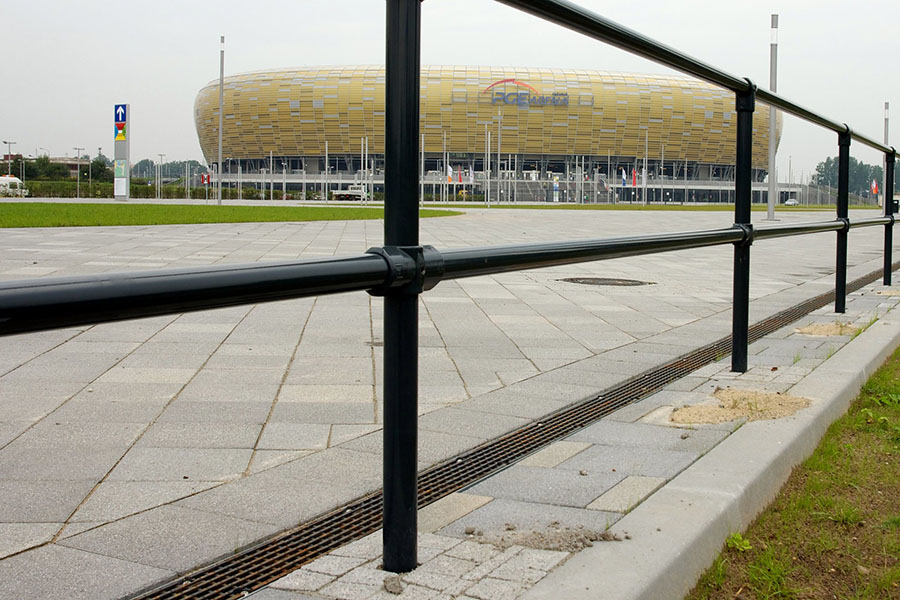
Guardrail & Railing Examples
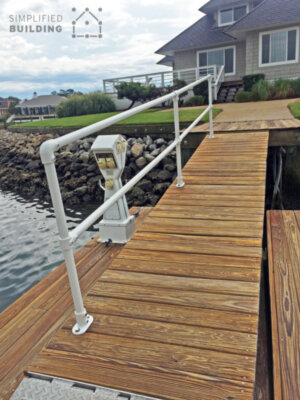
Loading Dock Railing
Protect your docks with a guardrail made from pipe and fittings. Even if your dock is less than 48 inches, building code may still require guardrail to protect your people. Below is an example of a short section. You can add corners, multiple stair sections, ramps, and more.

Specs:
- Dock Rail Length: 16' (image not to scale)
- Dock Rail Height: 3' 6"
- Stair Rail Height: 3'
- Pipe Size: 1.5"
Assembly:
- This is an example of a railing you would use on a dock with stair access.
What's included:
Whether you’re a contractor without time to fabricate your own railing or an owner that wants to tackle the railing installation on your own, a pipe and fittings railing is the right fit for you.
There are experts available to help you design the railing you need and walk you through its installation. However, the joy of pipe and fittings is how easy it is to do on your own. If this is your first time designing your own railing, then this guide will walk you through the decisions you’ll need to make to get it right the first time.
The Value of Pipe and Fittings
Simple
Pipe railing is easy to design and install. No special permits or permissions are required to install a pipe railing made with fittings. No welding is required.
Durable
Fittings are available fully galvanized or aluminum. Studies have shown that pipe railing built with fittings lasts up to seven times longer than fabricated pipe railing.
Versatile
Pipe can be cut to fit on site and Our wide variety of fittings can be used to design pipe railing for any scenario.
Control
Using pipe and fittings allows you to control both the time it takes to design and the design itself. You don’t have to rely on others to finish the job you needed done yesterday.
The Various Types of Railings to Design
The First Metal Railing Design Choices to Make
What type of metal should you use?
There are several choices that need to be made to help guide which fittings and pipe you use for your railing. The first choice is the type of metal that you will use. Here at Simplified Building, you can choose between galvanized steel and anodized aluminum railing.
However, here is a bird’s eye view:
- Galvanized steel is stronger than aluminum. Aluminum is still a safe metal to use, however, you can get away with longer post spans with steel because of this strength.
- Aluminum is lighter than steel. This makes it easier to handle during installation or if you need to remove it for any reason.
- Corrosion is going to depend on your environment. More often, aluminum is going to be more corrosive resistant. However, we’ve worked with customers where galvanized steel was the better option. So, check with your local conditions before making this choice.
What size pipe should you use?
The size of the pipe that you use will depend on your application. We suggest that you use a 1-1/4” (size 7) pipe for handrails. It provides a better gripping surface for support rails.
If you are building a guardrail, then we suggest a 1-1/2” (size 8) pipe. The extra strength and rigidity are better suited for impact and allow for more grace with post spacing.
Something else to consider while choosing the size of your pipe is the type of fittings that are available in that size. Most standard fittings are available in both sizes. If you run into a unique application, then you may need to choose one or the other based on what fittings best solve your problem.
Designing Your Metal Railing Posts
Most railings will have different posts throughout the system. Different posts will be needed for the ends and throughout the system. The posts through the system may also need to be different depending on slope changes, direction changes, or any other obstacle the environment requires you to work around.
Here is what you need to know when you’re designing the various posts in your metal railing.
Number of Rails Needed
When picking the fittings that you want to use, the first thing that you need to consider is how many rails you need. OSHA guardrail typically has 2 rails unless you have a parapet or wall that is 21” or taller. In that case, you’ll only need one.
The fittings that you use for the top rail will be different than the fittings for the mid rail. Fittings for the top rail act as the cap for the post to help close it off from outside influences, like weather and insects.
The Posts Layout
Once you’ve determined the rail count, then you should determine where all your posts will be laid out. For the guardrail, we advise you to not exceed 8’ on center using size 8 pipe. For the handrail, we suggest using a 6’ on center post spacing. These are not hard and fast rules, but you should speak with an expert if you want to change from this.
When you have laid out your posts, this should give you a good idea of the types of posts that you need. Most often, guardrails end up on flat walking and working surfaces (1/12 slope or less). These are straightforward posts and use standard fittings for railing construction.
However, you may need to turn a corner or change your slope for a ramp or stair. In this case, you will want to make sure that the fittings you choose allow you to have a plumb post with a sloped railing. The angle of the required slope will determine which fitting works best.
Corners, Handrails, and Ends
Corners can be addressed in multiple ways. You can have a post right on the corner or you can have the post offset from the corner and use elbow fittings to make the turn.
Handrails can be added to guardrails to provide appropriate support and ADA compliance. Here is a list of fittings that we use to work with ADA compliance.
You will also need to determine how you'd like to terminate your railing. You can end the railing at a final post or extend past that post and wrap it back on itself like a D. Or, you can have the railing mount into an existing structure, like a wall or an existing railing.
Mounting the Railing
The last thing you need to think about is how you will mount the railing. The most common application is mounting to the walking surface. The flange that you use for this will change depending on the slope of the surface and whether you need toeboard.
Toeboard is needed to prevent tools or debris from rolling off the edge onto persons below or dangerous equipment.
Other times, you will want to mount to the wall adjacent to the surface. If the mounting connection is below the walking surface, then we advise that you use two flanges per post. Don’t forget to check if the post needs to clear the lip of the surface, like with stone capping on a parapet wall.
Examples of Post Assemblies
Other Applications to Consider
Powder Coating
Pipe railing can be coated with a durable finish. This baked on finish improves the aesthetics of the railing and makes the pipe railing even more corrosion resistant. Both the pipe and the fittings can be powder coated
Infill Panels
Some local codes require that you include infill panels when certain people are accessing the area. This can be a vertical picket, a 4” x 4” wire grid, or other custom design.
Let Us Help You Build Your Railing
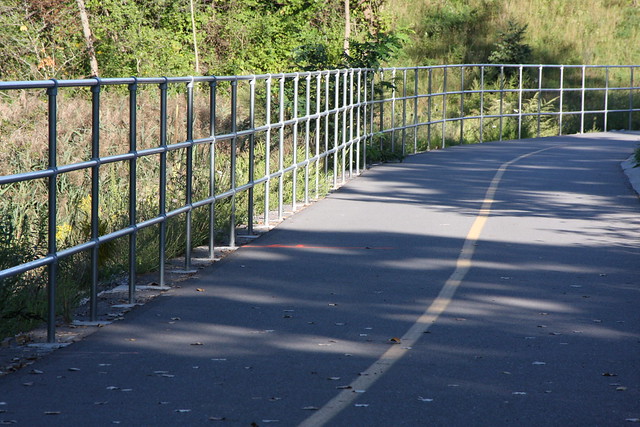
Wall Mounted Guardrail
Guarding your edge with a wall-mounted railing is easy with pipe and fittings. This will keep people safe if you are on a parking structure or a clarifier. The example below assumes that your wall is 21 inches high or more.
Specs:
- Guardrail Length: 16' (Image not to scale)
- Guardrail Height: 3' 6"
- Post Height: 2'
- Assumed Parapet Height: 1' 9" or more.
- Pipe Size: 1.5"
Assembly:
- A single rail guardrail that you would use on a parapet of 21 inches of height or more.
What's included:
What's not:
Whether you’re a contractor without time to fabricate your own railing or an owner that wants to tackle the railing installation on your own, a pipe and fittings railing is the right fit for you.
There are experts available to help you design the railing you need and walk you through its installation. However, the joy of pipe and fittings is how easy it is to do on your own. If this is your first time designing your own railing, then this guide will walk you through the decisions you’ll need to make to get it right the first time.
The Value of Pipe and Fittings
Simple
Pipe railing is easy to design and install. No special permits or permissions are required to install a pipe railing made with fittings. No welding is required.
Durable
Fittings are available fully galvanized or aluminum. Studies have shown that pipe railing built with fittings lasts up to seven times longer than fabricated pipe railing.
Versatile
Pipe can be cut to fit on site and Our wide variety of fittings can be used to design pipe railing for any scenario.
Control
Using pipe and fittings allows you to control both the time it takes to design and the design itself. You don’t have to rely on others to finish the job you needed done yesterday.
The Various Types of Railings to Design
The First Metal Railing Design Choices to Make
What type of metal should you use?
There are several choices that need to be made to help guide which fittings and pipe you use for your railing. The first choice is the type of metal that you will use. Here at Simplified Building, you can choose between galvanized steel and anodized aluminum railing.
However, here is a bird’s eye view:
- Galvanized steel is stronger than aluminum. Aluminum is still a safe metal to use, however, you can get away with longer post spans with steel because of this strength.
- Aluminum is lighter than steel. This makes it easier to handle during installation or if you need to remove it for any reason.
- Corrosion is going to depend on your environment. More often, aluminum is going to be more corrosive resistant. However, we’ve worked with customers where galvanized steel was the better option. So, check with your local conditions before making this choice.
What size pipe should you use?
The size of the pipe that you use will depend on your application. We suggest that you use a 1-1/4” (size 7) pipe for handrails. It provides a better gripping surface for support rails.
If you are building a guardrail, then we suggest a 1-1/2” (size 8) pipe. The extra strength and rigidity are better suited for impact and allow for more grace with post spacing.
Something else to consider while choosing the size of your pipe is the type of fittings that are available in that size. Most standard fittings are available in both sizes. If you run into a unique application, then you may need to choose one or the other based on what fittings best solve your problem.
Designing Your Metal Railing Posts
Most railings will have different posts throughout the system. Different posts will be needed for the ends and throughout the system. The posts through the system may also need to be different depending on slope changes, direction changes, or any other obstacle the environment requires you to work around.
Here is what you need to know when you’re designing the various posts in your metal railing.
Number of Rails Needed
When picking the fittings that you want to use, the first thing that you need to consider is how many rails you need. OSHA guardrail typically has 2 rails unless you have a parapet or wall that is 21” or taller. In that case, you’ll only need one.
The fittings that you use for the top rail will be different than the fittings for the mid rail. Fittings for the top rail act as the cap for the post to help close it off from outside influences, like weather and insects.
The Posts Layout
Once you’ve determined the rail count, then you should determine where all your posts will be laid out. For the guardrail, we advise you to not exceed 8’ on center using size 8 pipe. For the handrail, we suggest using a 6’ on center post spacing. These are not hard and fast rules, but you should speak with an expert if you want to change from this.
When you have laid out your posts, this should give you a good idea of the types of posts that you need. Most often, guardrails end up on flat walking and working surfaces (1/12 slope or less). These are straightforward posts and use standard fittings for railing construction.
However, you may need to turn a corner or change your slope for a ramp or stair. In this case, you will want to make sure that the fittings you choose allow you to have a plumb post with a sloped railing. The angle of the required slope will determine which fitting works best.
Corners, Handrails, and Ends
Corners can be addressed in multiple ways. You can have a post right on the corner or you can have the post offset from the corner and use elbow fittings to make the turn.
Handrails can be added to guardrails to provide appropriate support and ADA compliance. Here is a list of fittings that we use to work with ADA compliance.
You will also need to determine how you'd like to terminate your railing. You can end the railing at a final post or extend past that post and wrap it back on itself like a D. Or, you can have the railing mount into an existing structure, like a wall or an existing railing.
Mounting the Railing
The last thing you need to think about is how you will mount the railing. The most common application is mounting to the walking surface. The flange that you use for this will change depending on the slope of the surface and whether you need toeboard.
Toeboard is needed to prevent tools or debris from rolling off the edge onto persons below or dangerous equipment.
Other times, you will want to mount to the wall adjacent to the surface. If the mounting connection is below the walking surface, then we advise that you use two flanges per post. Don’t forget to check if the post needs to clear the lip of the surface, like with stone capping on a parapet wall.
Examples of Post Assemblies
Other Applications to Consider
Powder Coating
Pipe railing can be coated with a durable finish. This baked on finish improves the aesthetics of the railing and makes the pipe railing even more corrosion resistant. Both the pipe and the fittings can be powder coated
Infill Panels
Some local codes require that you include infill panels when certain people are accessing the area. This can be a vertical picket, a 4” x 4” wire grid, or other custom design.
Let Us Help You Build Your Railing
Warehouse Guardrail
Separating your workers from forklift traffic is as easy as installing metal railing with pipe and fittings. This is useful for workspaces with machinery or exits from an office building. Check out the example below to see just how simple it is.

Specs:
- Guardrail Length: 12' x 6'
- Guardrail Height: 3' 6'
- Pipe Size: 1.5"
Assembly:
- A typical guardrail design that is used to divide workers from warehouse traffic.
What's included:
What's not:
Whether you’re a contractor without time to fabricate your own railing or an owner that wants to tackle the railing installation on your own, a pipe and fittings railing is the right fit for you.
There are experts available to help you design the railing you need and walk you through its installation. However, the joy of pipe and fittings is how easy it is to do on your own. If this is your first time designing your own railing, then this guide will walk you through the decisions you’ll need to make to get it right the first time.
The Value of Pipe and Fittings
Simple
Pipe railing is easy to design and install. No special permits or permissions are required to install a pipe railing made with fittings. No welding is required.
Durable
Fittings are available fully galvanized or aluminum. Studies have shown that pipe railing built with fittings lasts up to seven times longer than fabricated pipe railing.
Versatile
Pipe can be cut to fit on site and Our wide variety of fittings can be used to design pipe railing for any scenario.
Control
Using pipe and fittings allows you to control both the time it takes to design and the design itself. You don’t have to rely on others to finish the job you needed done yesterday.
The Various Types of Railings to Design
The First Metal Railing Design Choices to Make
What type of metal should you use?
There are several choices that need to be made to help guide which fittings and pipe you use for your railing. The first choice is the type of metal that you will use. Here at Simplified Building, you can choose between galvanized steel and anodized aluminum railing.
However, here is a bird’s eye view:
- Galvanized steel is stronger than aluminum. Aluminum is still a safe metal to use, however, you can get away with longer post spans with steel because of this strength.
- Aluminum is lighter than steel. This makes it easier to handle during installation or if you need to remove it for any reason.
- Corrosion is going to depend on your environment. More often, aluminum is going to be more corrosive resistant. However, we’ve worked with customers where galvanized steel was the better option. So, check with your local conditions before making this choice.
What size pipe should you use?
The size of the pipe that you use will depend on your application. We suggest that you use a 1-1/4” (size 7) pipe for handrails. It provides a better gripping surface for support rails.
If you are building a guardrail, then we suggest a 1-1/2” (size 8) pipe. The extra strength and rigidity are better suited for impact and allow for more grace with post spacing.
Something else to consider while choosing the size of your pipe is the type of fittings that are available in that size. Most standard fittings are available in both sizes. If you run into a unique application, then you may need to choose one or the other based on what fittings best solve your problem.
Designing Your Metal Railing Posts
Most railings will have different posts throughout the system. Different posts will be needed for the ends and throughout the system. The posts through the system may also need to be different depending on slope changes, direction changes, or any other obstacle the environment requires you to work around.
Here is what you need to know when you’re designing the various posts in your metal railing.
Number of Rails Needed
When picking the fittings that you want to use, the first thing that you need to consider is how many rails you need. OSHA guardrail typically has 2 rails unless you have a parapet or wall that is 21” or taller. In that case, you’ll only need one.
The fittings that you use for the top rail will be different than the fittings for the mid rail. Fittings for the top rail act as the cap for the post to help close it off from outside influences, like weather and insects.
The Posts Layout
Once you’ve determined the rail count, then you should determine where all your posts will be laid out. For the guardrail, we advise you to not exceed 8’ on center using size 8 pipe. For the handrail, we suggest using a 6’ on center post spacing. These are not hard and fast rules, but you should speak with an expert if you want to change from this.
When you have laid out your posts, this should give you a good idea of the types of posts that you need. Most often, guardrails end up on flat walking and working surfaces (1/12 slope or less). These are straightforward posts and use standard fittings for railing construction.
However, you may need to turn a corner or change your slope for a ramp or stair. In this case, you will want to make sure that the fittings you choose allow you to have a plumb post with a sloped railing. The angle of the required slope will determine which fitting works best.
Corners, Handrails, and Ends
Corners can be addressed in multiple ways. You can have a post right on the corner or you can have the post offset from the corner and use elbow fittings to make the turn.
Handrails can be added to guardrails to provide appropriate support and ADA compliance. Here is a list of fittings that we use to work with ADA compliance.
You will also need to determine how you'd like to terminate your railing. You can end the railing at a final post or extend past that post and wrap it back on itself like a D. Or, you can have the railing mount into an existing structure, like a wall or an existing railing.
Mounting the Railing
The last thing you need to think about is how you will mount the railing. The most common application is mounting to the walking surface. The flange that you use for this will change depending on the slope of the surface and whether you need toeboard.
Toeboard is needed to prevent tools or debris from rolling off the edge onto persons below or dangerous equipment.
Other times, you will want to mount to the wall adjacent to the surface. If the mounting connection is below the walking surface, then we advise that you use two flanges per post. Don’t forget to check if the post needs to clear the lip of the surface, like with stone capping on a parapet wall.
Examples of Post Assemblies
Other Applications to Consider
Powder Coating
Pipe railing can be coated with a durable finish. This baked on finish improves the aesthetics of the railing and makes the pipe railing even more corrosion resistant. Both the pipe and the fittings can be powder coated
Infill Panels
Some local codes require that you include infill panels when certain people are accessing the area. This can be a vertical picket, a 4” x 4” wire grid, or other custom design.