DIY Endzone Camera "Tripod" Support

_-_Copy2.jpg "Quadpod1 (32) - Copy")
Back in August of this year, a football coach sent me an email asking about whether or not we could make an Endzone Camera tripod out of Kee Klamp fittings and pipe. He said that sports teams are spending 3,000 to 6,000 dollars each on pre-manufactured units. Consequently many coaches are having to choose new uniforms over purchasing an Endzone Camera. With the Quadpod Endzone Camera made out of Kee Klamp fittings and fence pipe, many more teams should be able to have both.
It became quickly apparent that a 3 legged tri-pod would not easily work with Kee Klamp. But a 4 legged pod or Quadpod would work really well. The Quadpod is very stable on level surfaces and would work great for taking video and pics of any sports events, but especially football games as the title suggests. The following is my attempt at documenting how to build the Quadpod for less than $500. Questions and comments are welcome!
2.jpg "Quadpod (1)")
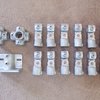
The Fittings:
Here are all the Kee Klamp fittings I used to build the Quadpod:
12 x Type C50-66
2 x Type 40-6
1 x Type 69-6.
Kee Klamp fittings can be purchased via our website www.simplifiedbuilding.com
A_22.jpg "Quadpod1 (54)A")
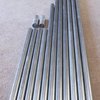
The Pipe:
I used 1-3/8 fence pipe from Home Depot. This pic does not show the 20 piece that was cut into 8 x 2.5 pieces shown below.
The two couplings in the middle left of the pic are for the vertical pieces that make up the 20 total height of the Quadpod. The lengths are as follows:
1 x 10
4 x 6
1 x 5
1 x 4
4 x 33
1 x 20 (8 x 2.5 only shown below)
A_23.jpg "Quadpod1 (25)A")
Cut 8 pieces of 2.5 lengths of 1-3/8 fence pipe. I used a sawzall since the cuts dont have to be perfect. A standard pipe cutter would work great too.
A_22.jpg "Quadpod1 (59)A")
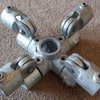
Connect 4 of the C50-6 fittings to one of the 40-6 fittings via 4 of the 2.5 pieces of pipe. This will create your Lower Assembly. Tighten set screws.
A_22.jpg "Quadpod1 (57)A")
Connect 4 more of the C50-6 fittings to the remaining 40-6 fitting via the 4 remaining 2.5 pieces of pipe. This will be your Upper Assembly. Tighten set screws.
A_22.jpg "Quadpod1 (33)A")
The Lower Assembly and Upper Assembly, connected to the 4 piece of pipe, will make up the Main Assembly shown here. Tighten set screws.
_-_Copy1.jpg "Quadpod1 (30) - Copy")
A_22.jpg "Quadpod1 (61)A")
Slide the 4 remaining C50-6 fittings onto the 6 lengths of pipe (about 1 to 18) and then place the 33 lengths of pipe into the sockets of the same C50-6 fittings as shown. Well call this the Leg and Brace Assembly. You should have 4 identical sets. Tighten set screws.
_12.jpg "Quadpod1 (3)")
Attach the 33 lengths of pipe from the Leg and Brace Assemblies onto the C50-6 fittings of the Lower Assembly. Tighten set-screws
A_22.jpg "Quadpod1 (15)A")
Slide the 6 pieces of pipe from the Leg and Support Assemblies into the C50-6 fittings of the Upper Assembly. Tighten set-screws.
A_22.jpg "Quadpod1 (4)A")
The Main Assembly and Leg and Brace Assembly should look like this after attaching all pipe and fittings together correctly and securely. Well call this the Complete Base. Tighten set screws.
_-_CopyA_22.jpg "Quadpod1 (19) - CopyA")
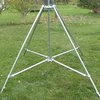
The Complete Base collapsed. This allows for portability of your Quadpod. If you loosen each set screw (4 total) of the C50-66 fittings that are on the 6 legs of the Leg and Brace Assembly, you can collapse the entire unit. Once collapsed, you can re-tighten the 4 set-screws. This will keep the Complete Base as compact as possible for transporting from one event to the next or for storage.
A_22.jpg "Quadpod1 (6)A")
Attach the 69-6 fitting to the top of your vertical extension (before putting into the air). In this pic, I have a box of baby formula that was sent to us in the mail as a free gift. Gotta love those free gifts! Anyway, I duct-taped that to the 69-6 fitting because I dont have a video camera and I thought it would be close to the actual size of a video camera. Its not a great shot of the 69-6 fitting, but it should give you the right idea.

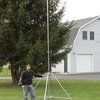
1.jpg "Quadpod1 (18)")
Heres two more shots with my 6 year old son showing off in one, and me looking all cool in the other. The top is about 20' in the air (not shown in either pic here). The vertical member consists of the 4 piece of pipe of the Main Assembly (which is about 1 off the ground to start), then a fence coupling (shown in a previous pic above) with the 5 piece of pipe, then lastly the second fence coupling with the 10 piece of pipe.
You can attach your camera, wiring, and any other gadgets necessary to take video from 15-20 feet in the air. It should cost you less than $500 for the pipe and fittings. Feel free to contact me with any questions.
Sam Wender
585-672-7312 office
888-527-2278 toll-free
sam@simplifiedbuilding.com
